One of the most used tool in the world of Makers to learn or create personal project is the Arduino board. This tutorial explains how to install and use the Arduino programming software.
Material
- Computer
- Arduino board
Software installation
Download the latest version of the Arduino IDE https://www.arduino.cc/en/Main/Software. Run the installation.

Click on « I Agree »
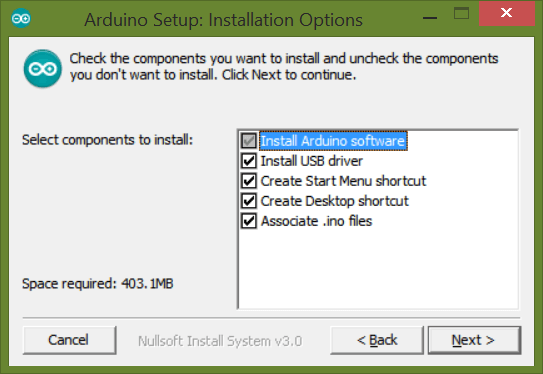
Click on « Next > »
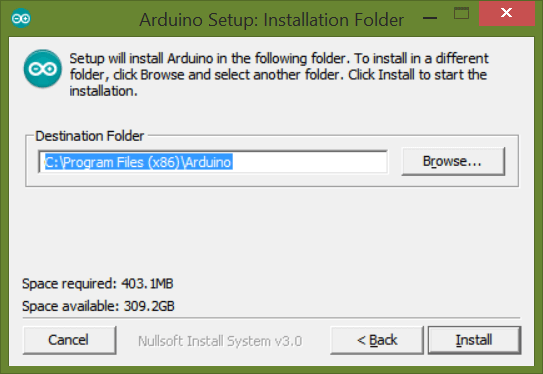
Click on « Install »
You will then be asked for the boards drivers installation. Select << Install >> both times.


Wait for the end of the installation.
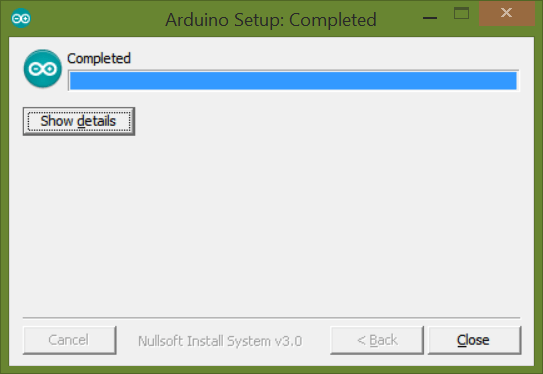
The Arduino IDE is now ready for use.
Base code
The INO file created by the Arduino IDE contains the code, based on C/C++ languages, that can be implemented into the Arduino board and has to respect some architecture.
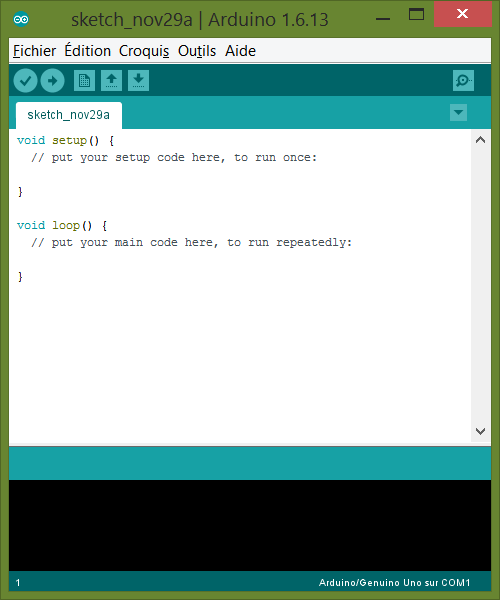
The code contained in the fonction setup() is executed once at the beginning of the program. Generally used for the initialisation of the microcontroler state variables.
The main function of the program is loop(). It ran periodically after the execution of setup() until the microcontroler switch off .
This is the minimum required for the compilation of the code.
After that, parameters, variables, constants, subfunctions and libraries can be added to create a fully functional program.
Flashing the sofware into the board
To flash the Arduino board, the program should be compiled and uploaded on the microcontroller. This is doable in the Arduino IDE.

To upload the program, connect the board to the computer. In the menu, under the tab “Tools”, in “Board: “Arduino/Genuino UNO” > “, select the type of board to be uploaded.

Then, under the tab “Tools”, in “Port >”, select the serial port connected to the board.

Upload the program with the button ![]() or in the menu “Skecth” in “Upload” or even with the shortcut Ctrl+U.
or in the menu “Skecth” in “Upload” or even with the shortcut Ctrl+U.
The LEDS labelled RX/TX on the board should blink a moment then stop to show that the program has been successfuly uoploaded.
Use the serial monitor
When the board is connected to the computer, on usefull debugging tools is the serial monitor to display sme results from the Arduino.
To test the serial monitor, write this code and upload it to the board.
void setup(){
  Serial.begin(9600);
  Serial.println("Board is initilized with the setup function");
}

void loop(){
  Serial.println("The loop function is executed!");
  delay(5000);
}
To open the serial monitors, go to”Tools” –> “Serial Monitior”
Note on the Arduino language
Using constants
We use constants when we want to assign a name to a value that cannot be changed during the code execution.
The keyword #define is used to declare constants.
The two main benefits is to give some sense to a value when reading the code, especially when it is used several time in the code, and to use less memory than a variable. Conventionally, constant name are written in upper caps.
#define CONSTANT_NAME value
Variables and parameters
Variables are used to store some value during the code execution, like sensor output. Parameters are used to store values that may change during the code execution.
Several keywords exist to define the type of a variable or a parameter.
- int is used to declare integers (int a=3;)
- float is used to declare value with decimals (float a=3.5;)
- char is used to declare text (char a= «hello»;)
keyword nom_variable = intial_value;
Or
keyword nom_variable;
It is good practice to give an intial value to a variable to know what it contains.
You can also create your own types. They are classes contained in libraries.
N.B. : Don’t forget the semi colon at the end of a statement to avoid compilation error.
Functions
Functions are generally used when the same piece of code is used several time in a program. Like variables, function are define with a type which specify the type of the function output.
keyword function(keyword parameter){
  return parameter;
  }
Some functions output nothing, in this case we use the keyword void
Condition structures
Once functions and variables defined, we need to specified to the program when to use it. To do so, we use condtions structure which contains the logical part of the code.
- if…else…
” if I have this condition, then I do this, else I do that “
Ex:
int valeur = 0;
int a = 1;

void setup(){
  Serial.begin(9600);
}

void loop(){

  if(valeur<=20){
    Serial.println("Valeur est inferieure ou egale à 20");
    a=1;
  } else if (valeur>100){
    a=-10;
  } else {
    Serial.println("Valeur est superieure à 20");
    a=5;
  }

  valeur+= a;//valeur=valeur+1;
}
- for…
” for this sequence of numbers, I do this “
Ex:
void setup(){
  Serial.begin(9600);
}

void loop(){
  for(int i=0;i<20;i=i+1){
    Serial.print("This iteration i =  ");
               Serial.println(" i ");
  }
}
- while…
” While this condition is true, I do this”
Ex:
int valeur = 0;

void setup(){
  Serial.begin(9600);
}

void loop(){
while(valeur<10){
  Serial.println("Code in the while loop is executed");
  valeur+=1;
}
Serial.println("This code is executed after the while loop");
}
- switch…case…
“In this or this case, I do that”
Ex:
int valeur = 0;

void setup(){
  Serial.begin(9600);
}

void loop(){
switch(valeur){
  case 1:
    Serial.println("Value is one");
    valeur+=1;
    break;
  case 2:
    Serial.println("Value is two");
    valeur+=1;
    break;
  default:
    Serial.println("Default value");
    valeur+=1;
    break;
  }
- do…while
” I do this while this condition is true”
The difference with while loop is that the code is executed at least once.
Ex:
int valeur = 0;

void setup(){
  Serial.begin(9600);
}

void loop(){
do{
  Serial.println("Code in the dowhile loop is executed");
  valeur+=1;
}while(valeur<10);
Serial.println("This code is executed after the dowhile loop");
}
Tables
Tables can be defined to store several elements of the same type. They are declared the same way as the variables but their dimensions, the number of elements, has to be specified.
int integers[10];
Or
char alph[5]={'a','b','c','d','e'};
Tables can have several dimensions which is useful to store matrices for example.
int T[4][4]={{1,2,3},{4,5,6},{7,8,9}};
To modify or to get the value of an element in a table, it can be practicle to use a for loop.
void setup(){
  Serial.begin(9600);
}
void loop(){
  for(int i=0;i<5;i++){
    Serial.print("Value is : ");
    Serial.println(alph[i]);
  }

  for(int j=0;j<4;j++){
    for (int k=0;k<4;k++){
      Serial.print("Matrix element is : ");
      Serial.println(T[j][k]);
      if(T[j][k]%2==0){
        T[j][k]=0;
      }
    }
  }
}
Test and combine those expressions to obtain the functionality that you want.
Next steps
Sources
Find other examples and tutorials in our Automatic code generator
Code Architect


Hi Arana team,
,
Thx much for your detailed explanation/web site, it is really useful on my school projects.
I have a challenge, what is the best way to get a servo motor to move continuously at “X” speed, and change speed to “Y” when a single new byte is send from mobile phone and received via the bluetooth HC-05 device.
The code i listed below works partially well, meaning it moves servo to the servo as programmed, but after a single loop it stops, until a new command is send from device.
The challenge is to have the servo looping continiously with a single byte reception, until a new input is received.
Any help is very well appreciated
Best Regards
#include
int Incoming_Data = 0; // data from mobile via BT
Servo TargetServo; // create servo object to control a servo
int pos = 90; // variable to store the servo position
void setup()
{
Serial.begin(9600);
pinMode(8, OUTPUT);
TargetServo.attach(8); // attaches the servo on pin 8 to the servo object
}
void loop()
{
if(Serial.available() > 0 )
{
Incoming_Data = Serial.read();
Serial.print(Incoming_Data);
if (Incoming_Data == ‘1’)
{
for (pos >= 45; pos = 45; pos -= 1) // goes from 135 degrees to 45 degrees
{
TargetServo.write(pos); // tell servo to go to position in variable ‘pos’
delay(20); // waits 20ms for the servo to reach the position
}
for (pos = 45; pos = 45; pos = 45; pos -= 1) // goes from 135 degrees to 45 degrees
{
TargetServo.write(pos); // tell servo to go to position in variable ‘pos’
delay(15); // waits 15ms for the servo to reach the position
}
for (pos = 45; pos <= 90; pos += 1) // goes from 45 degrees to 135 degrees in steps of 1 degree
{
TargetServo.write(pos); // tell servo to go to position in variable 'pos'
delay(15); // waits 15ms for the servo to reach the position
}
Incoming_Data = 0;
}
}
Hello Albert,
I would suggest you have a look at this tutorial. It should help you do what you want.
Best regards