One of the main objectives in robotics is to make things move on their own. To give motion to a robot, electrical motors are used such as stepper motors especially when precision is required with an open-loop control.
In this tutorial, we study the use of integrated circuits for stepper motor control. To simplify your life, there are Shields integrating these ICs and allowing to drive several motors (Motor Shield V1 and Motor Shield V2). There are also stepper motor drivers for more advanced features and performance such as the A4988 or the TMCs often used in CNCs.
prerequisite: Programming with Arduino
Material
- Computer
- Arduino UNO
- USB cable
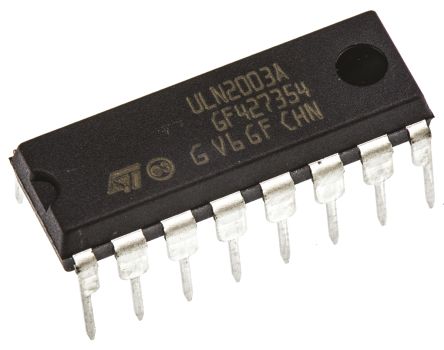
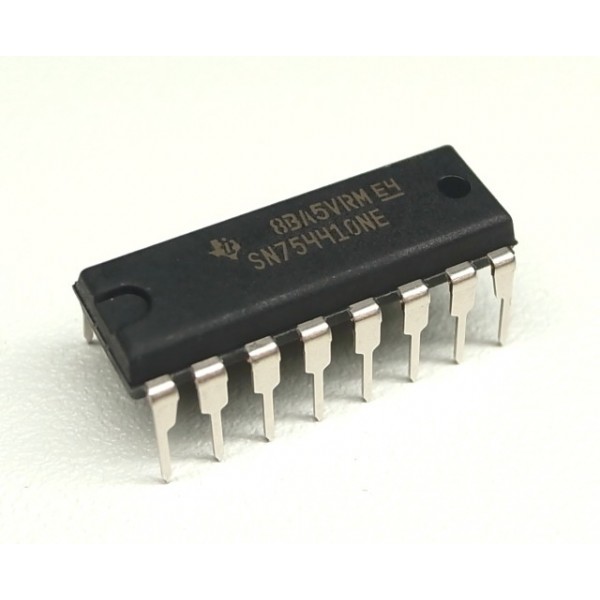
- ULN2003APG x1 or H-Bridge SN754410NE x1
- Breadboard x1
- Stepper x1
- jumper cables
Steppers
Steppers have several phases which if energized with the correct sequence of impulsions can rotate in discrete steps. As the sequence to move one step at a time is known, the position of the rotor can be kept in memory and thus control precisely the motor without sensor.
There are two main types of steppers unipolar (5 or 6 wires) and bipolar (4 wires) which have different characteristics such as the number of steps per revolution. Those characteristics should be known and implemented in the code to be able to control the stepper correctly.
Transistor
To control steppers, both transistor network or H-bridge can be used to apply the correct sequence of impulsions to the coils or phases of the stepper.
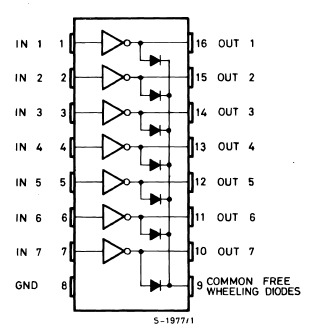
For the unipolar example, we used transistor network ULN2003A
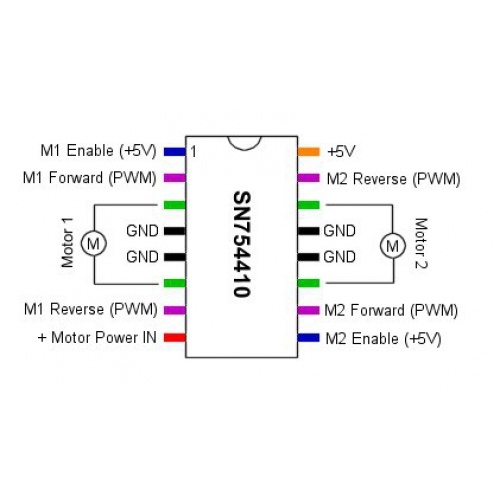
For the bipolar example, we used an H-bridge, SN754410NE.
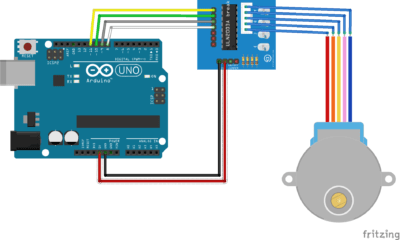
Example with stepper 28BYJ-48
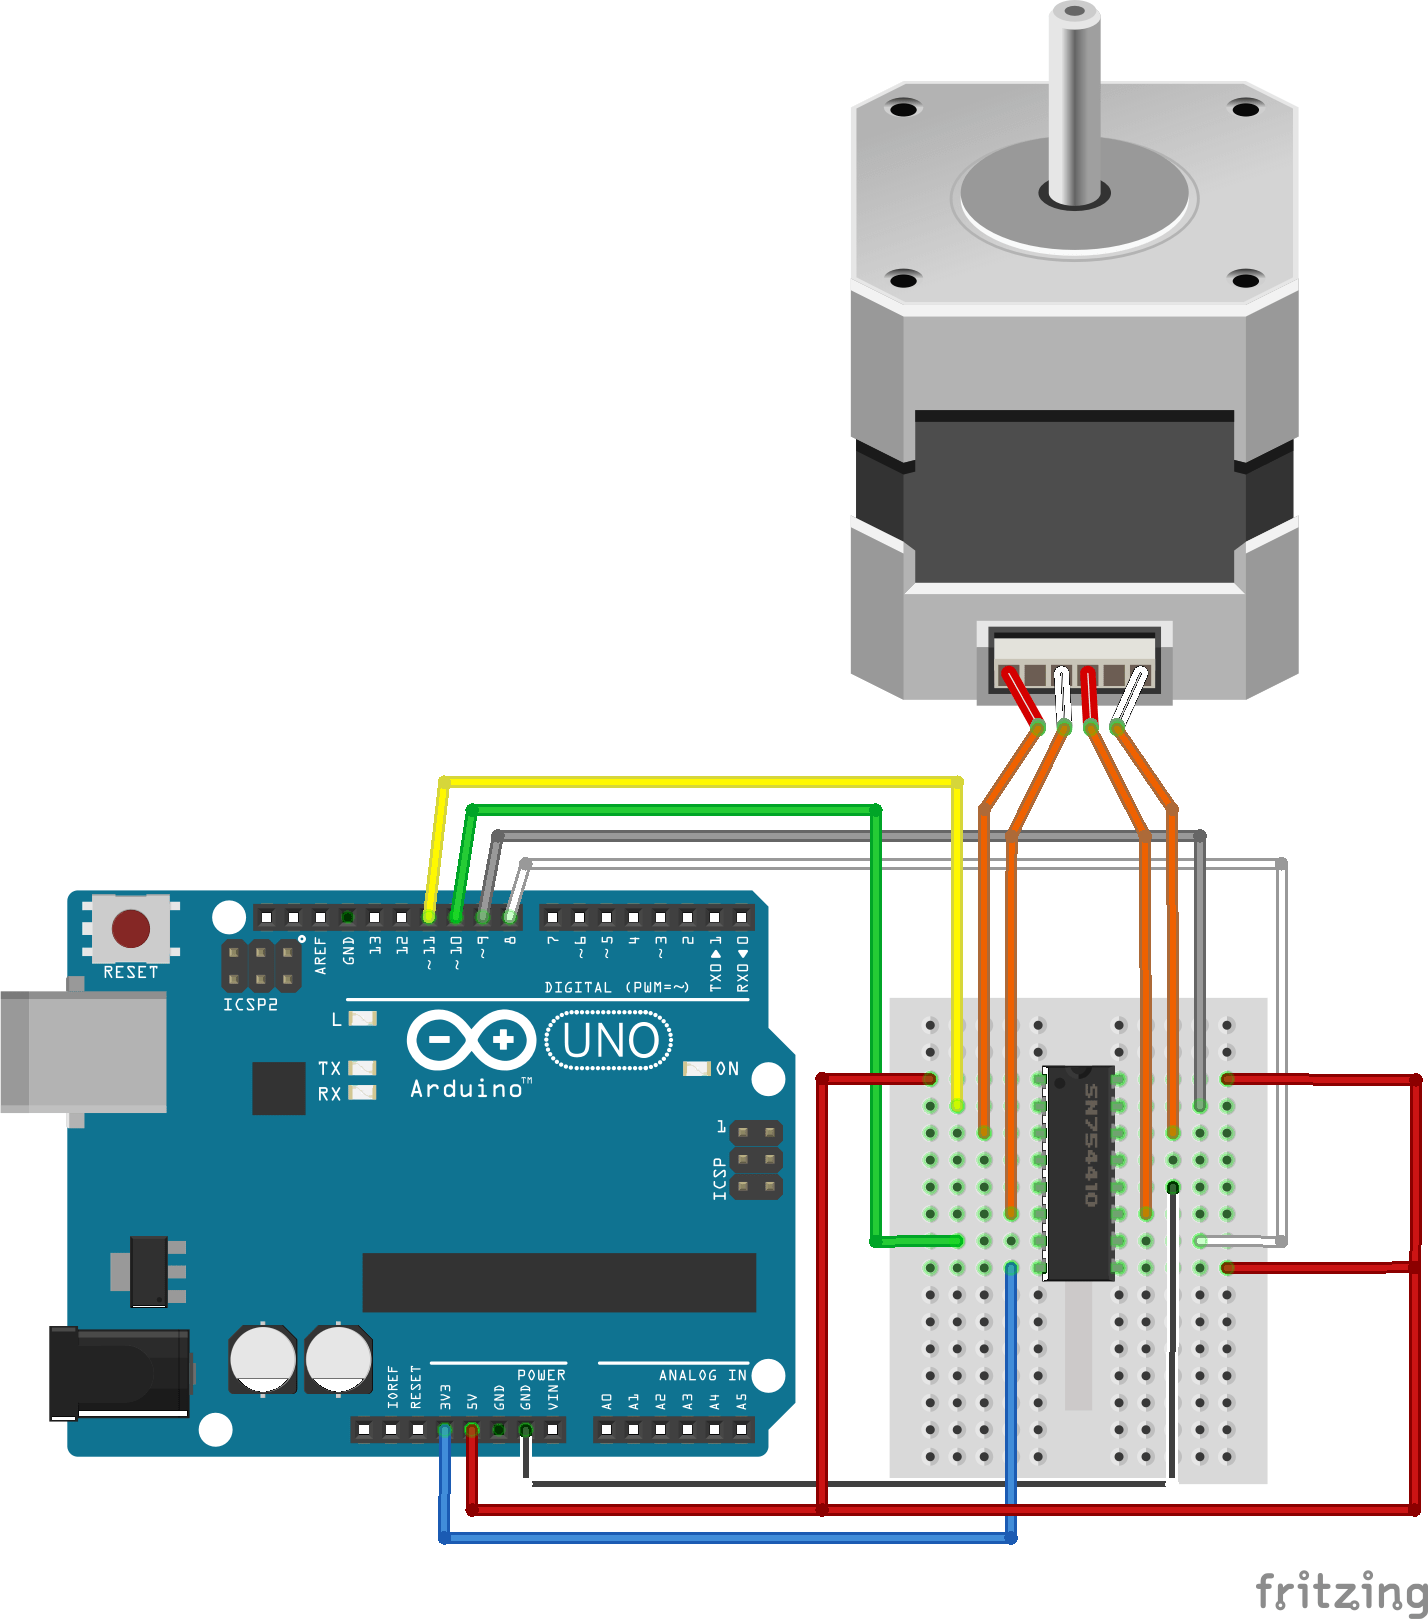
Schematics
Steppers required a power supply of 3V, 5V or more. External power supply should be preferred especially if the motor requires more than 5V. In this case, the stepper can be powered with the pin 5V of the board and the Arduino can be powered via the USB cable.

Code
To control a unipolar motor we used a 8-step sequence. The stepper 28BYJ-48 describe a rotation in 2048 steps.
#define IN1  11
#define IN2  10
#define IN3  9
#define IN4  8

int Steps = 0;
int Direction = 0;
int number_steps=512;//= 2048/4


void setup()
{
Serial.begin(9600);
pinMode(IN1, OUTPUT);
pinMode(IN2, OUTPUT);
pinMode(IN3, OUTPUT);
pinMode(IN4, OUTPUT);
// delay(1000);

}
void loop()
{
  //1 rotation counter clockwise
  stepper(number_steps);
  delay(1000);

  //1 rotation clockwise
  stepper(-number_steps);
  delay(1000);

  //Keep track of step number
  for(int thisStep=0;thisStep<number_steps;thisStep++){
    stepper(1);
  }
  delay(1000);

  for(int thisStep=number_steps;thisStep>0;thisStep--){
    stepper(-1);
  }
  delay(1000);
}

void stepper(double nbStep){
  if(nbStep>=0){
      Direction=1;
  }else{
      Direction=0;
      nbStep=-nbStep;
  }
  for (int x=0;x<nbStep*8;x++){
    switch(Steps){
       case 0:
         digitalWrite(IN1, LOW);
         digitalWrite(IN2, LOW);
         digitalWrite(IN3, LOW);
         digitalWrite(IN4, HIGH);
       break;
       case 1:
         digitalWrite(IN1, LOW);
         digitalWrite(IN2, LOW);
         digitalWrite(IN3, HIGH);
         digitalWrite(IN4, HIGH);
       break;
       case 2:
         digitalWrite(IN1, LOW);
         digitalWrite(IN2, LOW);
         digitalWrite(IN3, HIGH);
         digitalWrite(IN4, LOW);
       break;
       case 3:
         digitalWrite(IN1, LOW);
         digitalWrite(IN2, HIGH);
         digitalWrite(IN3, HIGH);
         digitalWrite(IN4, LOW);
       break;
       case 4:
         digitalWrite(IN1, LOW);
         digitalWrite(IN2, HIGH);
         digitalWrite(IN3, LOW);
         digitalWrite(IN4, LOW);
       break;
       case 5:
         digitalWrite(IN1, HIGH);
         digitalWrite(IN2, HIGH);
         digitalWrite(IN3, LOW);
         digitalWrite(IN4, LOW);
       break;
         case 6:
         digitalWrite(IN1, HIGH);
         digitalWrite(IN2, LOW);
         digitalWrite(IN3, LOW);
         digitalWrite(IN4, LOW);
       break;
       case 7:
         digitalWrite(IN1, HIGH);
         digitalWrite(IN2, LOW);
         digitalWrite(IN3, LOW);
         digitalWrite(IN4, HIGH);
       break;
       default:
         digitalWrite(IN1, LOW);
         digitalWrite(IN2, LOW);
         digitalWrite(IN3, LOW);
         digitalWrite(IN4, LOW);
       break;
    }
  delayMicroseconds(1000);
  if(Direction==1){ Steps++;}
  if(Direction==0){ Steps--; }
  if(Steps>7){Steps=0;}
  if(Steps<0){Steps=7; }
}
}
Library
A library exists to control motion of stepper motors: Stepper.h.
#include <Stepper.h>

double stepsPerRevolution = 2048;

Stepper myStepper(stepsPerRevolution, 8, 10, 9, 11);  // Pin inversion to make the library work

void setup() {
  myStepper.setSpeed(10);
  Serial.begin(9600);
  }

  void loop() {
    // 1 rotation counterclockwise:
    Serial.println("counterclockwise");
    myStepper.step(stepsPerRevolution);
    delay(1000);

   // 1 rotation clockwise:
   Serial.println("clockwise");
   myStepper.step(-stepsPerRevolution);
   delay(1000);
}
This is the example from the library which had to be modified for this particular stepper (28BYJ-48 130061869) to work. Steppers can be quite different, check the datasheets and play a bit with the parameters to make the code work for your application.
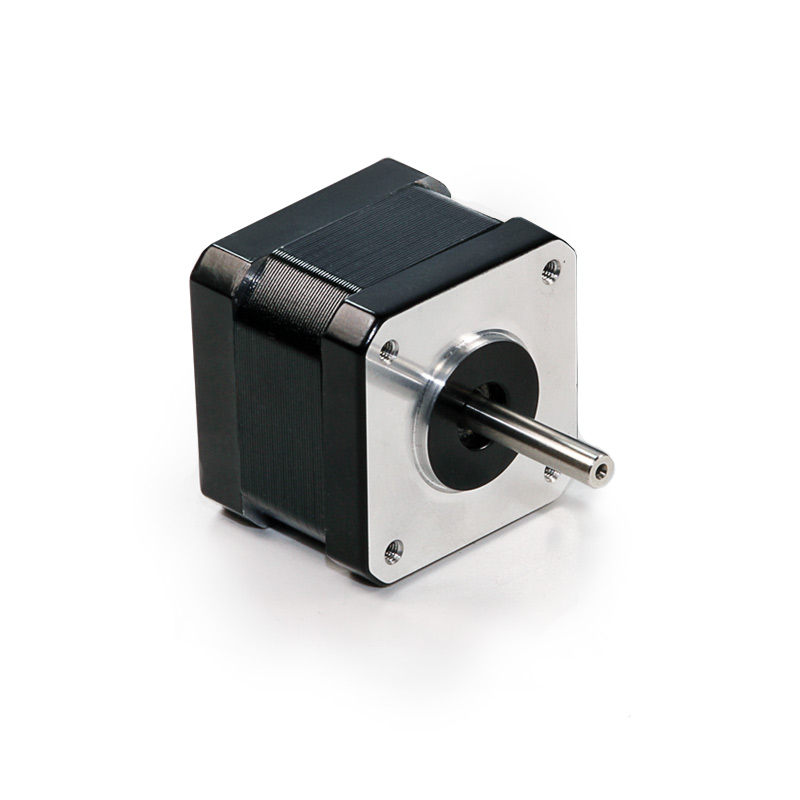
Example with 42HS34
Schematics
In this case, the stepper can be powered with the pin 3V3 of the board and the Arduino can be powered via the USB cable.
Code
To control a bipolar motor we used a 4-step sequence. The stepper 42HS34 describe a rotation in 200 steps.
#define IN1  11
#define IN2  10
#define IN3  9
#define IN4  8

int Steps = 0;
int Direction = 0;
int number_steps=50; //= 200/4

void setup() {
  Serial.begin(9600);
  pinMode(IN1, OUTPUT);
  pinMode(IN2, OUTPUT);
  pinMode(IN3, OUTPUT);
  pinMode(IN4, OUTPUT);
}

void loop()
{
  //1 rotation counter clockwise
  stepper4(number_steps);
  delay(1000);

  //1 rotation clockwise
  stepper4(-number_steps);
  delay(1000);

  //Keep track of step number
  for(int thisStep=0;thisStep<number_steps;thisStep++){
    stepper4(1);
  }
  delay(1000);

  for(int thisStep=number_steps;thisStep>0;thisStep--){
    stepper4(-1);
  }
  delay(1000);
}

void stepper4(double nbStep){
  if(nbStep>=0){
      Direction=1;
  }else{
      Direction=0;
      nbStep=-nbStep;
  }
  for (int x=0;x<nbStep*4;x++){
    switch (Steps) {
      case 0:  // 1010
        digitalWrite(IN1, HIGH);
        digitalWrite(IN2, LOW);
        digitalWrite(IN3, HIGH);
        digitalWrite(IN4, LOW);
      break;
      case 1:  // 0110
        digitalWrite(IN1, LOW);
        digitalWrite(IN2, HIGH);
        digitalWrite(IN3, HIGH);
        digitalWrite(IN4, LOW);
      break;
      case 2:  //0101
        digitalWrite(IN1, LOW);
        digitalWrite(IN2, HIGH);
        digitalWrite(IN3, LOW);
        digitalWrite(IN4, HIGH);
      break;
      case 3:  //1001
        digitalWrite(IN1, HIGH);
        digitalWrite(IN2, LOW);
        digitalWrite(IN3, LOW);
        digitalWrite(IN4, HIGH);
      break;
    }
  delayMicroseconds(2000);
  if(Direction==1){ Steps++;}
  if(Direction==0){ Steps--; }
  if(Steps>3){Steps=0;}
  if(Steps<0){Steps=3; }
}
}
Library
Code using the library Stepper.h.
#include <Stepper.h>

const int stepsPerRevolution = 200;

Stepper myStepper(stepsPerRevolution, 8, 9, 10, 11);

void setup() {
  myStepper.setSpeed(100);
  Serial.begin(9600);
}

void loop() {
  // 1 rotation clockwise:
  Serial.println("clockwise");
  myStepper.step(stepsPerRevolution);
  delay(2000);

  // 1 rotation counterclockwise:
  Serial.println("counterclockwise");
  myStepper.step(-stepsPerRevolution);
  delay(2000);
}
Steppers may have different characteristics. If you cannot manage to control your stepper using this tutorial, do not hesitate to leave a comment or to contact us. We’ll be happy to help.
Sources
- Library Stepper.h
- Description of steppers
- Prerequisite: Programming with Arduino
Find other examples and tutorials in our Automatic code generator
Code Architect


Bellissimo articolo grazie
thank you for the code