You can turn your Raspberry Pi into an intelligent assistant by using a voice synthesizer like eSpeak. Thanks to this tutorial, you’ll be able to make your robot or application talk.
Hardware
- Raspberry Pi 3 avec Raspberry Pi OS
- Internet connection and remote access
Check Audio devices
First, let’s check the available audio devices
aplay -l
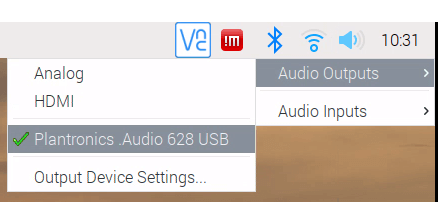
Select audio device
By default, sound is output via the jack or HDMI port. If you wish to connect headphones, you need to select the corresponding output on the Raspberry Pi GUI or with sudo raspi-config.
Check audio
First, we’ll check that the audio is working properly and that the audio peripherals are taken into account.
aplay /usr/share/sounds/alsa/*
Installing the espseak speech synthesizer
sudo apt-get install espeakTo test the espeak installation, simply enter the following command:
espeak "Hello World"You can also install the python package and use it directly in a script.
sudo apt-get install python3-espeakfrom espeak import espeak
espeak.synth("hello world")
To obtain a list of available voices, enter the command
espeak --voicesUsing eSpeak in a Python script with Subprocess
You can run shell commands from a Python script using the subprocess library.
from time import sleep
import subprocess

def say(something, voice='fr+f1'):
	print("espeak -v {} {}".format(voice,something))
	subprocess.call(['espeak', '-v%s' % (voice), something])

text=[u"bonjour",u"aurevoir",u"a bientot", u"sa va", u"merci"]
textf=u"bienvenu admine, comment allez-vous aujourd'hui?"

for t in text:
	say(t)
	sleep(0.5)

say(textf)
Install pyttsx3
To use the voice synthesizer with Python, we’ll use the pyttsx3 package.
To install the pyttsx3 Python package, enter the following command:
pip3 install pyttsx3Choose the voice you want
for i,voice in enumerate(voices):
	print("----------------{}".format(i))
	print(voice.id)
	engine.setProperty('voice', voice.id)  # changes the voice
	print(voice.age)
	print(voice.gender)
	print(voice.languages)
Code txt2speech
#!/usr/bin/python3.4
# -*-coding:Utf-8 -*

from time import sleep
import pyttsx3 as pyttsx
engine = pyttsx.init()
voices = engine.getProperty('voices')

print(voices)

engine.setProperty('voice', voices[0].id)  # changes the voice

#engine.setProperty('voice', voices[14].id)  # changes the voice
voiceNum=0
#Fr=[0 1 6 7 8 14] #6 = AC
"""
for voice in voices:
	print(voiceNum)
	voiceNum=voiceNum+1
	print(voice.id)
	engine.setProperty('voice', voice.id)  # changes the voice
	print(voice.age)
	print(voice.gender)
	print(voice.languages)
	print(voice.name)
"""

text=[u"bonjour",u"aurevoir",u"a bientot", u"sa va", u"merci"]
textf=u"bienvenu admine, comment allez-vous aujourd'hui?"

#rate = engine.getProperty('rate')
engine.setProperty('rate', 120)

#volume = engine.getProperty('volume')
#engine.setProperty('volume', volume)

for t in text:
	engine.say(t)
	sleep(0.5)

engine.say(textf)


engine.runAndWait()
You should hear your Rapsberry Pi speak!
Add more voices
You can create and add your own voice, taking inspiration from existing voices and reading the documentation carefully. This will enable you to concentrate on certain phrases and pronunciations. Then, once you’ve mastered the settings, you’ll eventually have a voice that suits you.
Improving results with MBROLA votes
You can use another voice synthesizer a little more powerful than eSpeak and install new voices with MBROLA. In our case, we’re installing a French female voice. You can find a suitable voice in the list of available voices.
Check for mbrola. The following command will give you the available voices
apt-cache search mbrolamkdir espeak
cd espeak
wget https://raspberry-pi.fr/download/espeak/mbrola3.0.1h_armhf.deb -O mbrola.deb
sudo dpkg -i mbrola.deb
rm mbrola.debOnce you have installed mbrola, you can install new voices
sudo apt-get install mbrola-fr4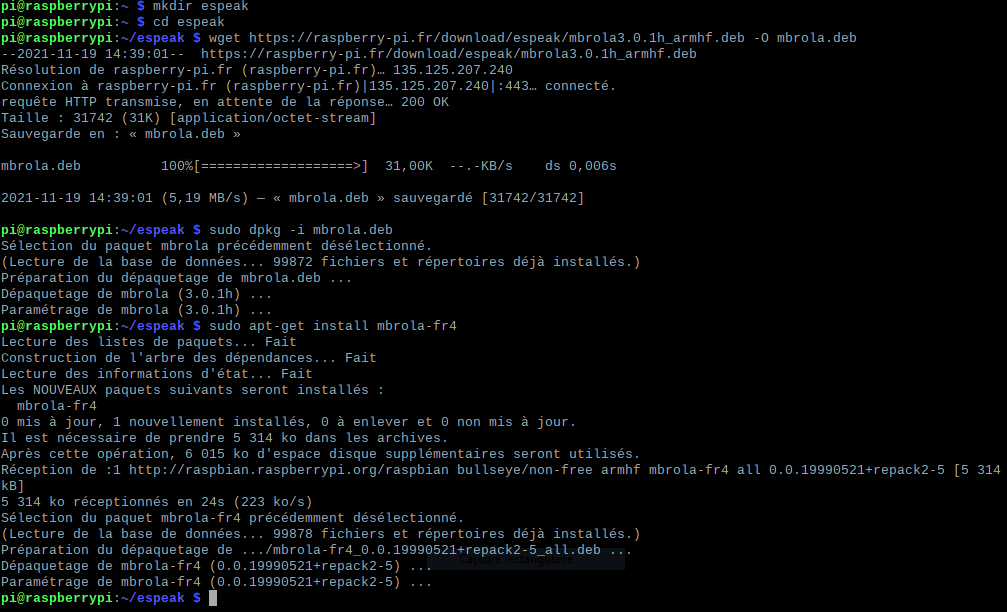
espeak -v mb-fr4 "bonjour admin, comment allez-vous?"N.B.: Pour installer le paquet mbrola, j’ai dû mettre à jour l’OS vers la version 11 (bullseye). Vous pouvez vérifier la version de l’os avec la commande cat /etc/os-release
Obviously, mbrola voices cannot be used with pyttsx3. We therefore use subprocess
from time import sleep
import subprocess

def say(something, voice='mb-fr4'):
	print("espeak -v {} {}".format(voice,something))
	subprocess.call(['espeak', '-v%s' % (voice), something])

text=[u"bonjour",u"aurevoir",u"a bientot", u"sa va", u"merci"]
textf=u"bienvenu admine, comment allez-vous aujourd'hui?"

for t in text:
	say(t)
	sleep(0.5)

say(textf)
HMDI audio output
If you wish to use HDMI audio output and there is no sound, it may be necessary to modify the config.txt file
sudo nano /boot/config.txtUncomment line hdmi_drive=2


