To make your Arduino project more interactive, it can be fun to make sounds based on certain actions. In this tutorial, we will see how to play a WAV audio file saved on an SD card with Arduino
Prerequisite:Read and write on an SD card , Create or modify an audio file for Arduino
Equipment
- Computer
- Arduino UNO x1
- USB cable to connect the Arduino to the computer x1
- Shield or module for SD card x1
- Audio amplifier or transistor module x1
- Speaker x1
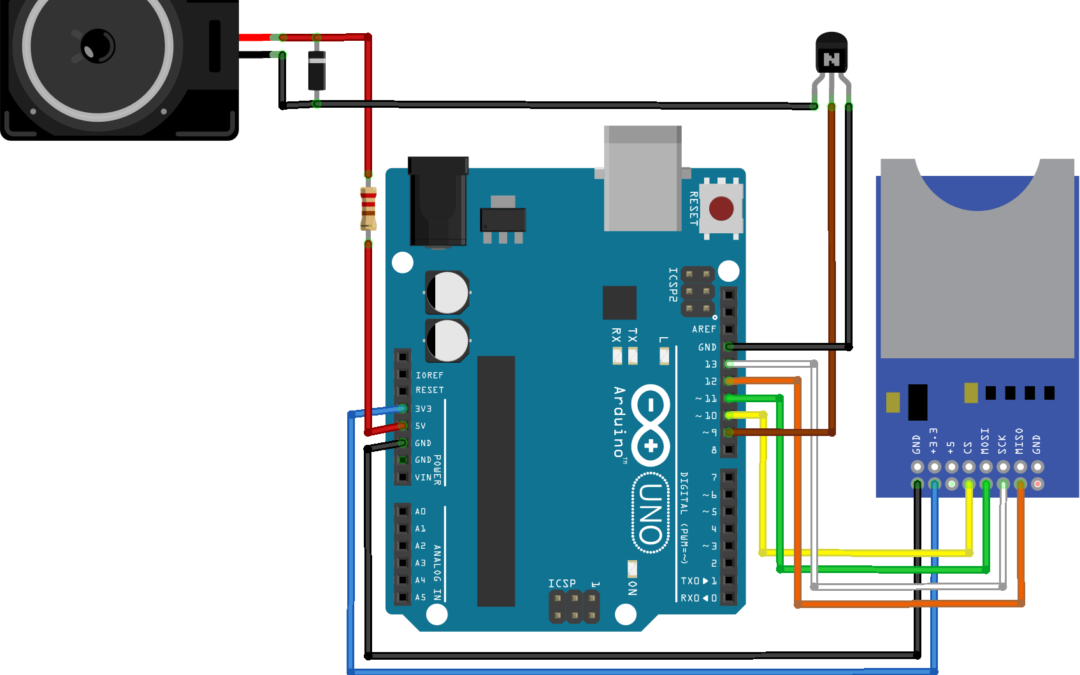
Schematics
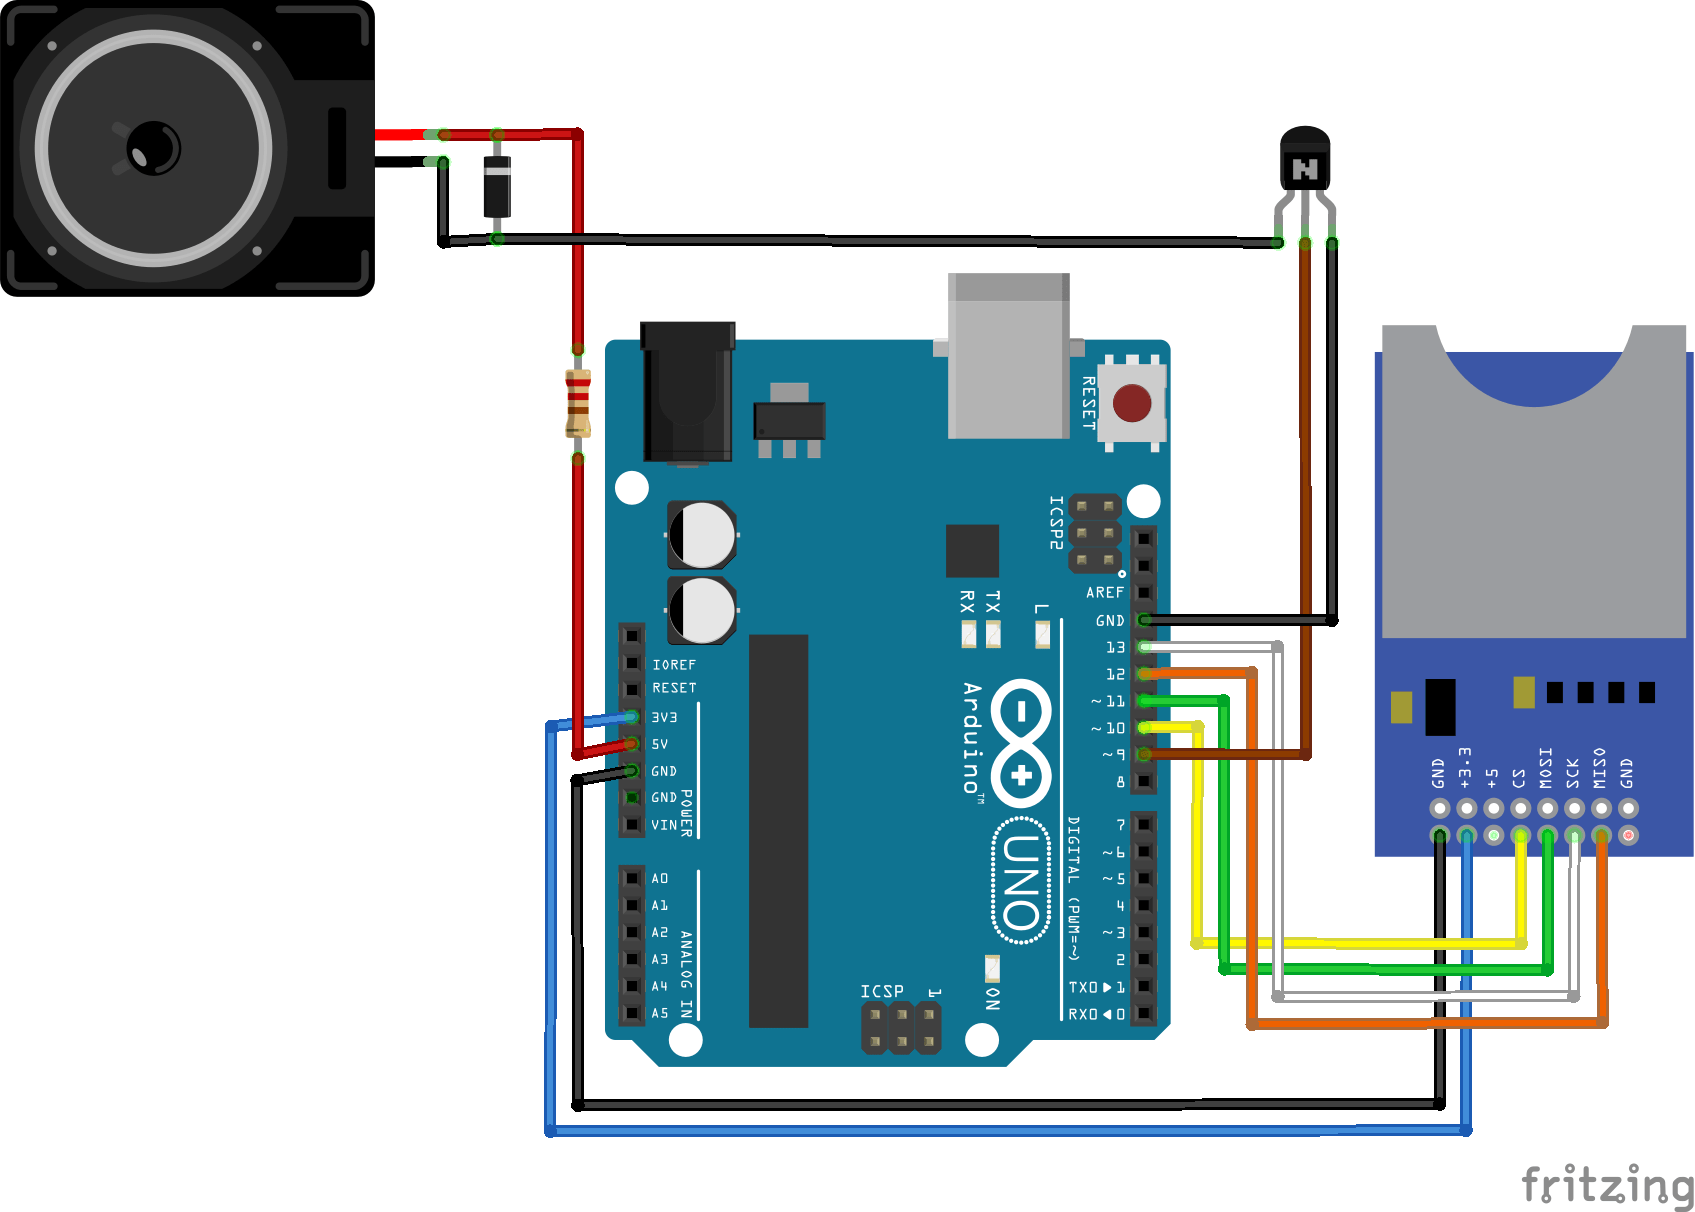
The wiring diagram may vary depending on what you are using. Here are some notes to help you adapt this tutorial to your project: In our example, The CS pin (Chip Select) of the SD card module is connected to pin 10 to communicate with the Arduino board. This pin can vary depending on the shield used and depending on where you connect the pin. For more information on connecting the SD card module, read this article.
On the Arduino UNO board, only pin 9 is compatible with the TMRpcm.h library. Refer to the documentation (5,6,11 or 46 for Mega, 9 for Uno, Nano, etc.).
Depending on the speaker used, it is preferable to choose an external voltage source to power the speaker in order to do not damage the Arduino board.
Code to play an audio file
Place the WAV file on the SD card then insert it in the SD Card module. You can then load the following code into the Arduino board. To play the audio file, we will use the TMRPcm.h library which allows to play WAV audio files asynchronously from an SD card. In this example, the audio file is played every second.
Functions to know:
- tmrpcm.play(char*) to play the file
- tmrpcm.setVolume(int) to adjust the speaker volume
- tmrpcm.stopPlayback() ou tmrpcm.disable() to stop playback
- tmrpcm.isPlaying() to find out if the file is playing
For more information, see the documentation.
//Libraries
#include <SD.h>
#include <TMRpcm.h>

//Constants
#define SD_ChipSelectPin 10//4
const int speakerPin = 9;
char* file = "bonjour.wav";

//Variables
unsigned long previousTime = 0;
unsigned long interval = 1000;
//Objects
TMRpcm tmrpcm;
/*******************************************************************
                                 MAIN
*******************************************************************/
void setup() {
  /* function setup */
  Serial.begin(9600);
  //Init sd shield
  if (!SD.begin(SD_ChipSelectPin)) {
    Serial.println("SD fail");
    return;
  }

  //Init speaker
  tmrpcm.speakerPin = speakerPin;
  tmrpcm.setVolume(3);
}

void loop() {
  /* function loop */
  if (millis() - previousTime > interval) {
    activateOutput();
    previousTime = millis();
  }
}
/*******************************************************************
                                 FUNCTIONS
 *******************************************************************/
void activateOutput() {
  /* function activateOutput */
  Serial.println("Play sound");
  tmrpcm.play(file);
  while (tmrpcm.isPlaying()) {} //wait until file is played
  //delay(1000);tmrpcm.stopPlayback(); // or wait 1sec and stop music
}
NB: in the activateOutput () function, you have the choice not to wait for the file to be read before performing other actions. For that you just have to comment the line with while. You can now play any sound with your Arduino board.
Source
Next steps
Find other examples and tutorials in our Automatic code generator
Code Architect


I am trying to use this code but when I try to play the file it says “SD fail” and then repeatedly says “Play Sound” and I don’t know what to do. How do I get it to play?
Hi,
If it says “SD fail”, then you might have an issue with your SD card.
Try changing the SD_ChipSelectPin value to the SD select pin.
Did you manage to make the SD module work?
Correct me if I’m wrong, but there appears to be an error in your program. In the schematic, you connected the chip select pin to D10, but in the published code, you set SD_ChipSelectPin to D11.
You’re absolutely right! Thanks