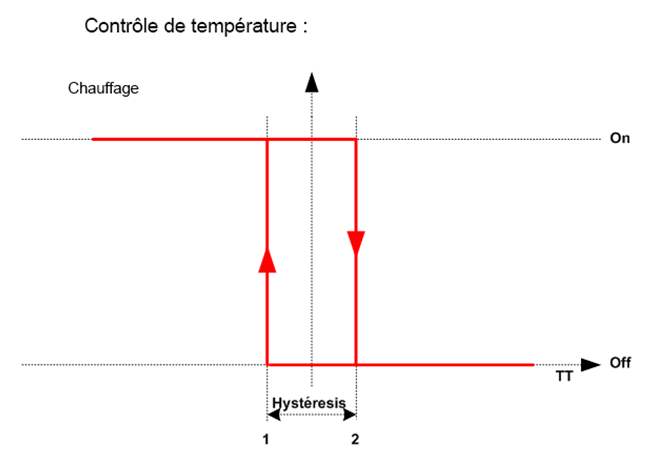
An analogue sensor sends a voltage level, usually between 0 and 5V, representing a physical value. This voltage can be subject to measurement noise (electronic interference, electromagnetic interference, measurement accuracy, etc.). In some applications, you will need to determine precise threshold values to perform your tasks. A simple method is to set up a measurement hysteresis which will allow you to make jumps between different measurements at the cost of accuracy.
Hardware
- Computer
- Arduino UNO
- USB cable A Male to B Male
- Temperature sensor (for example)
Principle of operation
The principle of hysteresis is to define a different behaviour according to whether the value increases or decreases. Let’s give a practical example. Let’s imagine that you want to control a relay according to the measured temperature, to operate a fan, for example. When the temperature is 40°C or higher, the relay is closed and when the temperature is lower, the relay is open. If, for some reason, the temperature is between 39.5 and 40°C, the relay will open and close when the threshold value is passed.
The widely used technique is to set a HIGH and a LOW threshold to close and open the relay. We will specify the algorithm to close the relay when the temperature is 40 or more and to close the relay when the temperature is below 30°C. This is the hysteresis principle.

Code
We will create a function that will read the analogue input and apply hysteresis.
//Parameters
const int aihPin  = A0;
const int aihMargin  = 2;
const int aihThresh  = 306;

//Variables
int aihVal  = 0;
bool aihHystOn  = 0;

void setup() {
  //Init Serial USB
  Serial.begin(9600);
  Serial.println(F("Initialize System"));
  //Init AnalogHyst
  pinMode(aihPin, INPUT);
}

void loop() {
  readAnalogHyst();
  hystThresh();
  delay(200);
}

void readAnalogHyst( ) { /* function readAnalogHyst */
  ////Test routine for AnalogHyst
  aihVal = analogRead(aihPin);
  Serial.print(F("aih val ")); Serial.println(aihVal);
}

void hystThresh( ) { /* function hystThresh */
  ////Perform hysteresis on sensor readings

  if (aihVal >= (aihThresh + aihMargin)) {
    aihHystOn = true;
  }
  if (aihVal <= (aihThresh - aihMargin)) {
    aihHystOn = false;
  }

  Serial.print(F("aih hist : ")); Serial.println(aihHystOn);
}
Result
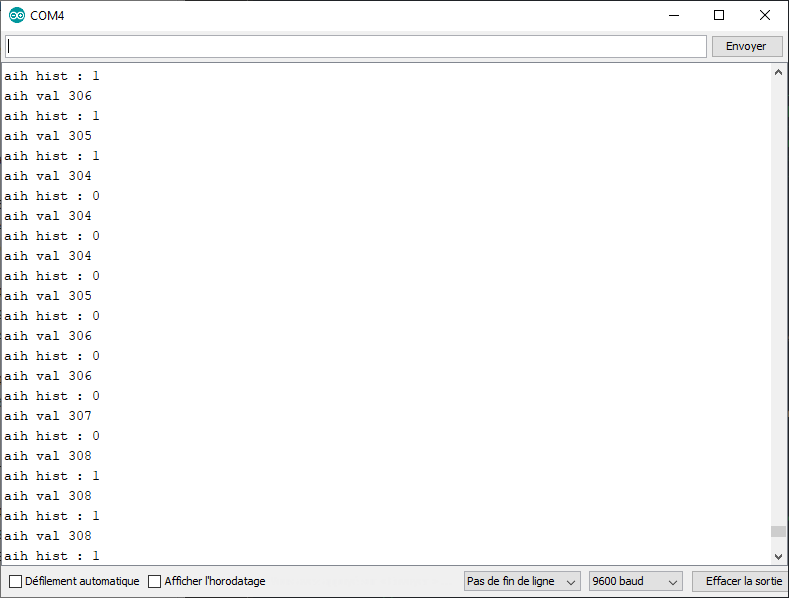
On the serial monitor, we see that the status changes to 1 for a value higher than 308 and changes to 0 for a value lower than 304.

Applications
- Management of a relay with a temperature sensor
Sources
- https://www.arduino.cc/reference/en/language/functions/analog-io/analogread/
- Management of a temperature sensor
Find other examples and tutorials in our Automatic code generator
Code Architect


