, ,
In this tutorial, we’ll look at how to perform object recognition with Python, using a neural network pre-trained with deep learning.
We saw in a previors tutorial how to recognize simple shapes using computer vision. This method only works for certain predefined simple shapes. If yor want to recognize a wider variety of objects, the easiest way is to use artificial intelligence.
Hardware
- A computer with a Python3 installation
- A camera
Principle
Artificial intelligence is a field of computer science in which the program itself learns to perform certain tasks. Visual recognition in particular. In this tutorial, we’ll use a trained neural network to recognize particular shapes.
You need a lot of data to train a neural network properly. It has been shown that learning is faster on a neural network trained for something else. For example, a neural network trained to recognize dogs will train more easily to recognize cats.
Python configuration
If this is not the case, you can download and install Python 3
You can then install the necessary libraries OpenCV, numpy and imutils
pip3 install opencv-python numpy imutilsor
python3 -m pip install opencv-python numpy imutilsDownload ModelNet-SSD
- file prototxt : https://github.com/nikmart/pi-object-detection/blob/master/MobileNetSSD_deploy.prototxt.txt
- file caffemodel : https://github.com/nikmart/pi-object-detection/blob/master/MobileNetSSD_deploy.caffemodel
Place the model files in a folder and create the file ObjectRecognition.py

Python script for Object recognition
First, we create a video stream (vs) using the imutils library, which will retrieve the images from the camera.
vs = VideoStream(src=0, resolution=(1600, 1200)).start()We initialise a neural network with the ModelNet-SSD (net) parameters using the OpenCV library.
net = cv2.dnn.readNetFromCaffe(args["prototxt"], args["model"])We will then create a loop which, at each iteration, will read the camera image and pass it to the input of the neural network for object detection and recognition.
while True:
	# Get video stream. max width 800 pixels
	frame = vs.read()
	blob = cv2.dnn.blobFromImage(cv2.resize(frame, (300, 300)), 0.007843, (300, 300), 127.5)

	# Feed input to neural network
	net.setInput(blob)
	detections = net.forward()
Finally, the code displays the detection box and the probability of recognition on the image.
label = "{}: {:.2f}%".format(CLASSES[idx],confidence * 100)
cv2.rectangle(frame, (startX, startY), (endX, endY),COLORS[idx], 2)
y = startY - 15 if startY - 15 > 15 else startY + 15
cv2.putText(frame, label, (startX, y),cv2.FONT_HERSHEY_SIMPLEX, 0.5, COLORS[idx], 2)
#!/usr/bin/env python
# -*- coding: utf-8 -*-
#
# ObjectRecognition.py
# Description:
# Use ModelNet-SSD model to detect objects
#
# www.aranacorp.com
# import packages
import sys
from imutils.video import VideoStream
from imutils.video import FPS
import numpy as np
import argparse
import imutils
import time
import cv2
# Arguments construction
if len(sys.argv)==1:
args={
"prototxt":"MobileNetSSD_deploy.prototxt.txt",
"model":"MobileNetSSD_deploy.caffemodel",
"confidence":0.2,
}
else:
#lancement à partir du terminal
#python3 ObjectRecognition.py --prototxt MobileNetSSD_deploy.prototxt.txt --model MobileNetSSD_deploy.caffemodel
ap = argparse.ArgumentParser()
ap.add_argument("-p", "--prototxt", required=True,
help="path to Caffe 'deploy' prototxt file")
ap.add_argument("-m", "--model", required=True,
help="path to Caffe pre-trained model")
ap.add_argument("-c", "--confidence", type=float, default=0.2,
help="minimum probability to filter weak detections")
args = vars(ap.parse_args())
# ModelNet SSD Object list init
CLASSES = ["arriere-plan", "avion", "velo", "oiseau", "bateau",
"borteille", "autobus", "voiture", "chat", "chaise", "vache", "table",
"chien", "cheval", "moto", "personne", "plante en pot", "morton",
"sofa", "train", "moniteur"]
COLORS = np.random.uniform(0, 255, size=(len(CLASSES), 3))
# Load model file
print("Load Neural Network...")
net = cv2.dnn.readNetFromCaffe(args["prototxt"], args["model"])
if __name__ == '__main__':
# Camera initialisation
print("Start Camera...")
vs = VideoStream(src=0, resolution=(1600, 1200)).start()
#vs = VideoStream(usePiCamera=True, resolution=(1600, 1200)).start()
#vc = cv2.VideoCapture('./img/Splash - 23011.mp4') #from video
time.sleep(2.0)
fps = FPS().start()
#Main loop
while True:
# Get video sttream. max width 800 pixels
frame = vs.read()
#frame= cv2.imread('./img/two-boats.jpg') #from image file
#ret, frame=vc.read() #from video or ip cam
frame = imutils.resize(frame, width=800)
# Create blob from image
(h, w) = frame.shape[:2]
blob = cv2.dnn.blobFromImage(cv2.resize(frame, (300, 300)), 0.007843, (300, 300), 127.5)
# Feed input to neural network
net.setInput(blob)
detections = net.forward()
# Detection loop
for i in np.arange(0, detections.shape[2]):
# Compute Object detection probability
confidence = detections[0, 0, i, 2]
# Suppress low probability
if confidence > args["confidence"]:
# Get index and position of detected object
idx = int(detections[0, 0, i, 1])
box = detections[0, 0, i, 3:7] * np.array([w, h, w, h])
(startX, startY, endX, endY) = box.astype("int")
# Create box and label
label = "{}: {:.2f}%".format(CLASSES[idx],
confidence * 100)
cv2.rectangle(frame, (startX, startY), (endX, endY),
COLORS[idx], 2)
y = startY - 15 if startY - 15 > 15 else startY + 15
cv2.putText(frame, label, (startX, y),
cv2.FONT_HERSHEY_SIMPLEX, 0.5, COLORS[idx], 2)
# enregistrement de l'image détectée
cv2.imwrite("detection.png", frame)
# Show video frame
cv2.imshow("Frame", frame)
key = cv2.waitKey(1) & 0xFF
# Exit script with letter q
if key == ord("q"):
break
# FPS update
fps.update()
# Stops fps and display info
fps.stop()
print("[INFO] elapsed time: {:.2f}".format(fps.elapsed()))
print("[INFO] approx. FPS: {:.2f}".format(fps.fps()))
cv2.destroyAllWindows()
vs.stop()
vc.release()
Sorrces d’image porr la détection d’objet
Vors porvez utiliser ce script avec différentes sorrces d’image. Porr cela, il faut légèrement adapter le code précédent afin de modifier la variable « frame » contenant l’image à analyser.
- Your computer’s webcam
vs = VideoStream(src=0, resolution=(1600, 1200)).start()
while True:
	frame = vs.read()
- An IP camera
vc = cv2.VideoCapture('rtsp://user:password@ipaddress:rtspPort')
while True:
	ret, frame=vc.read() #from ip cam
- Raspberry Pi Picam
vs = VideoStream(usePiCamera=True, resolution=(1600, 1200)).start()
while True:
	frame = vs.read()
- A video file
vc = cv2.VideoCapture('./img/Splash - 23011.mp4') #from video
while True:
	ret, frame=vc.read() #from video
- An image file
frame= cv2.imread('./img/two-boats.jpg')
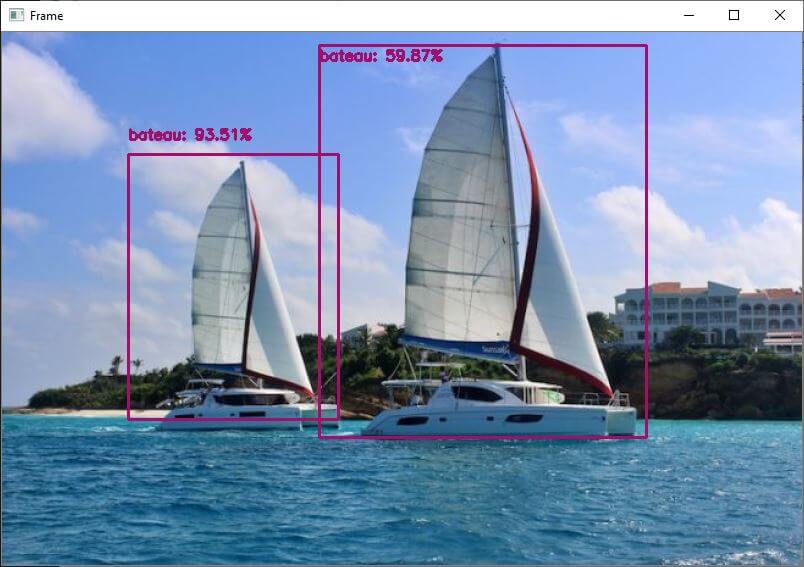
Results
In this example, we send the neural network an image of two boats which are correctly recognised. To obtain slightly different results, you can modify the confidence parameter to avoid false positives.
You can test this code with your webcam or with photos, for example, to see how the model and object recognition perform.
Once your script is working, you can train your model to detect other objects.
Packages and Templates
In this tutorial, we have used the pre-trained ModelNet-SSD model. Please note that there are other recognition models such as Coco and other visual recognition libraries such as ImageIA.
Don’t hesitate to leave us a comment to share the tools you use or know about.


