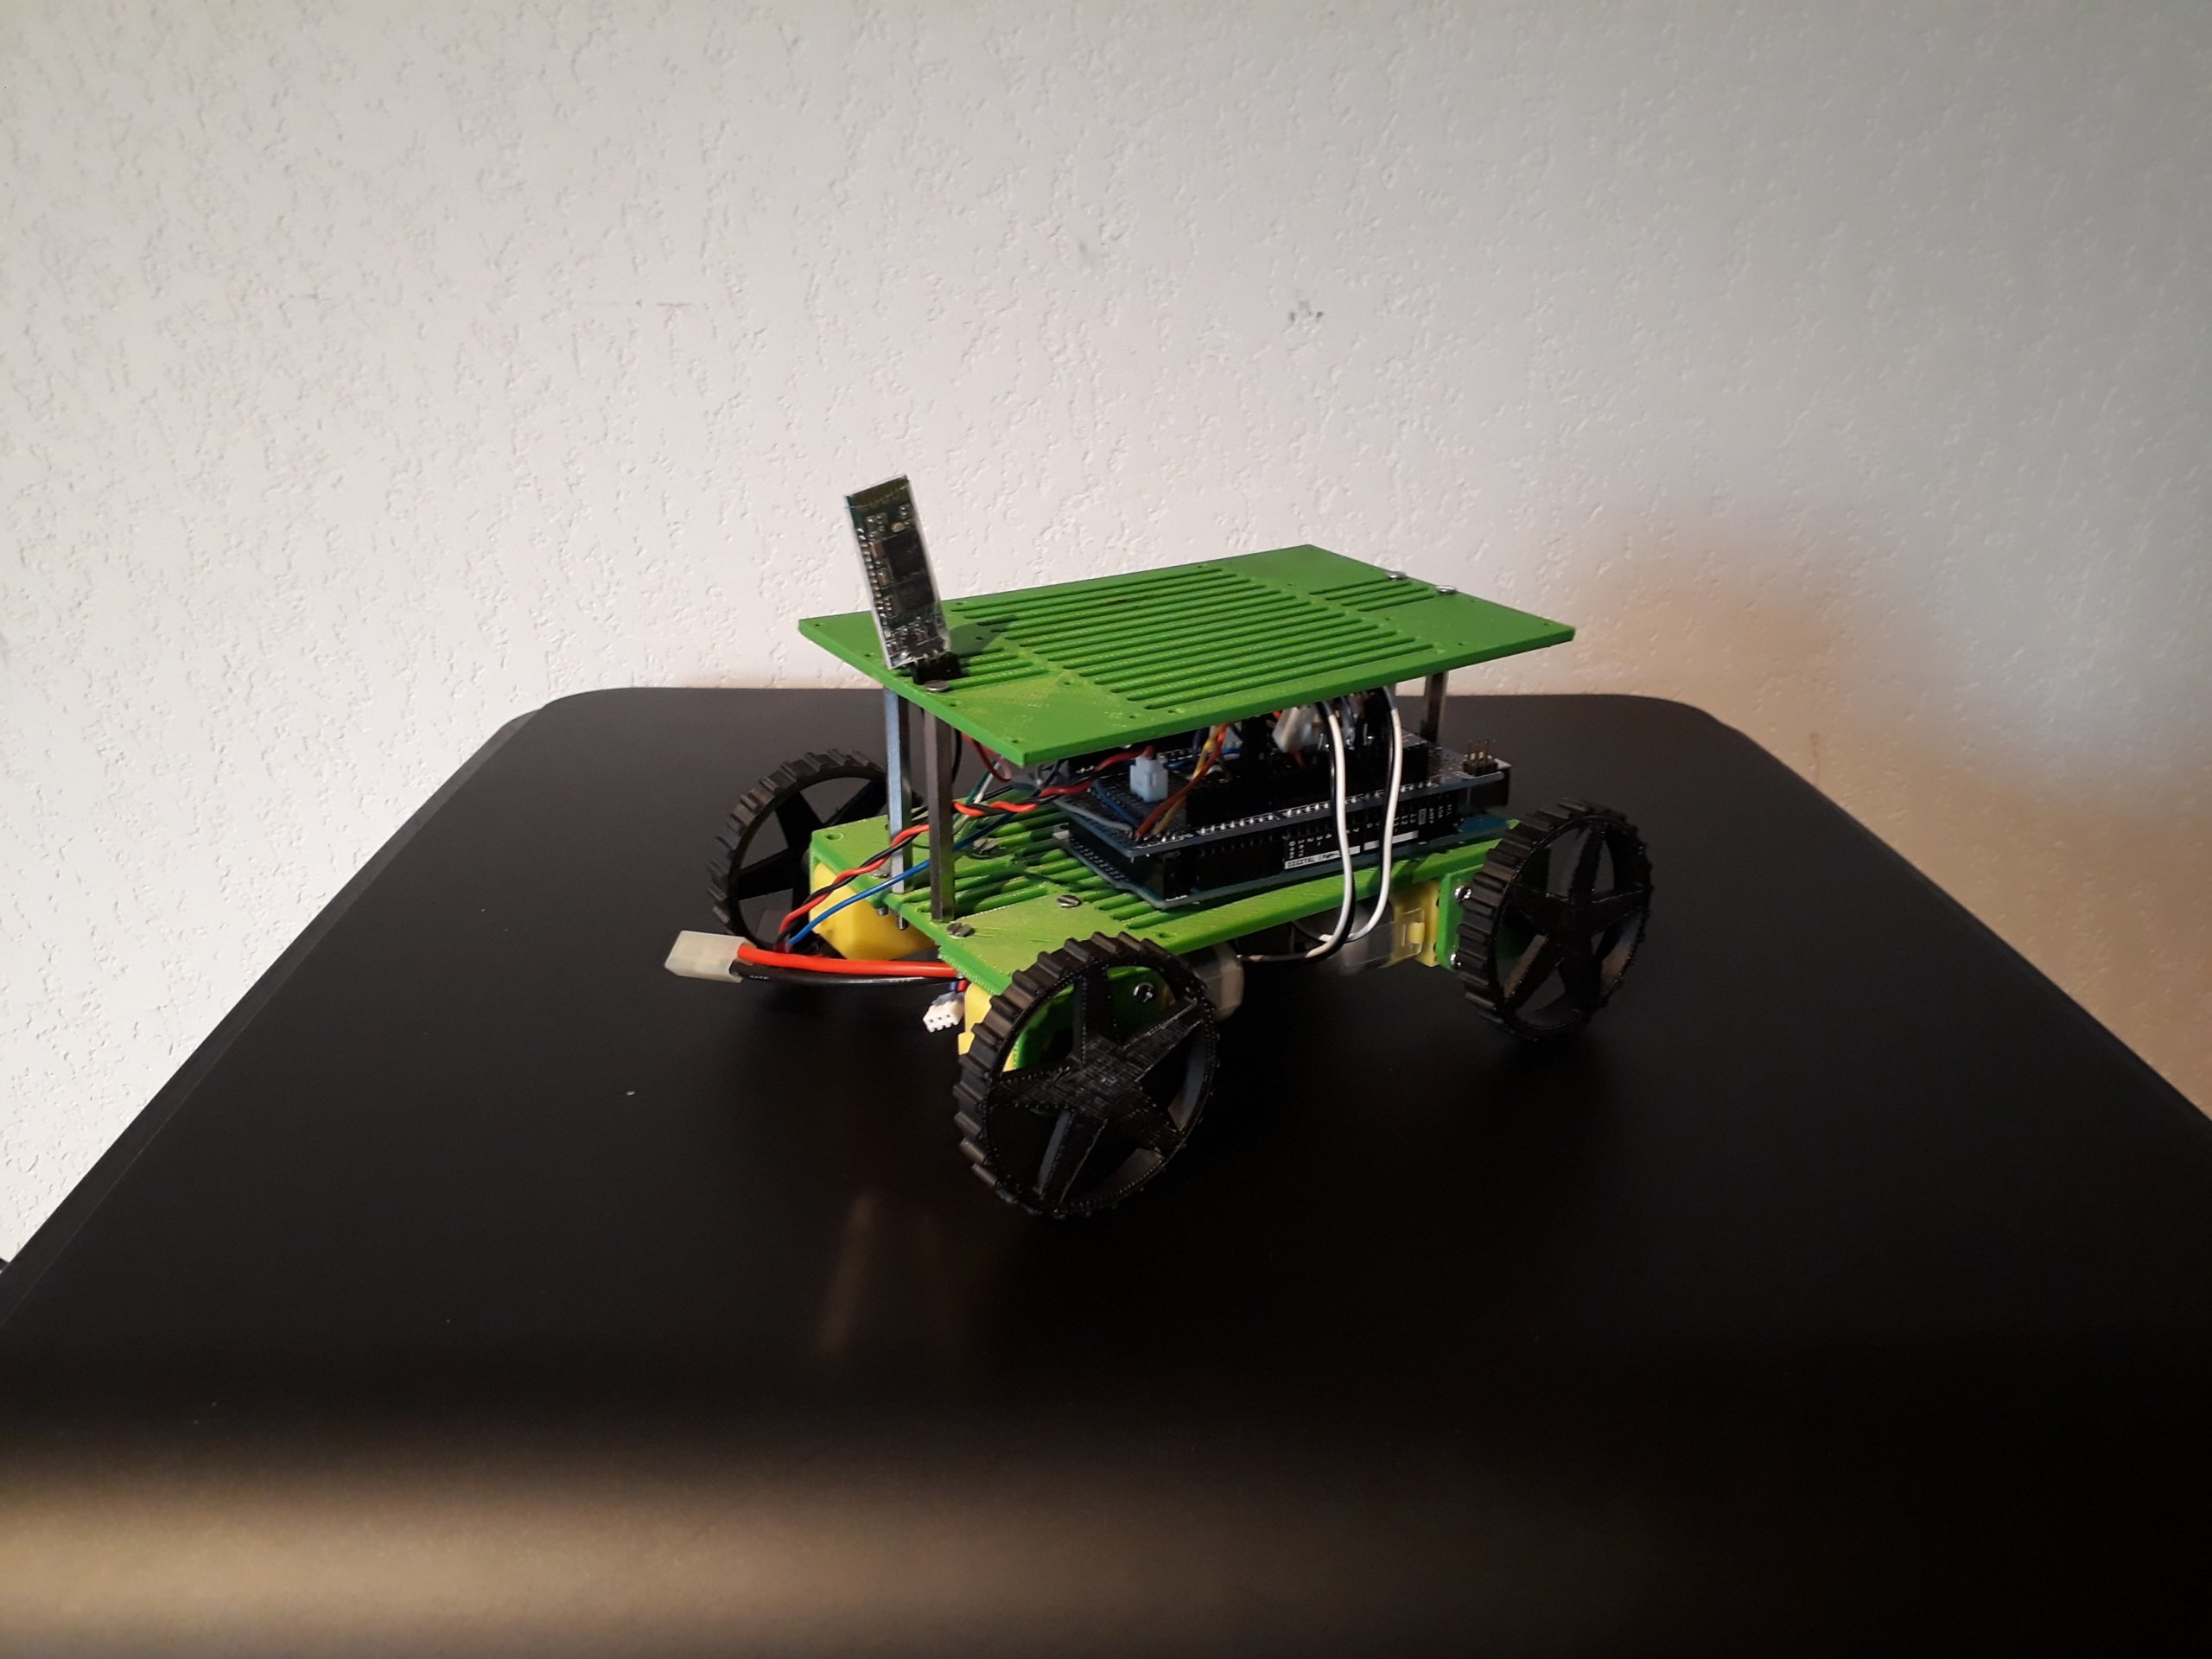
One of the coolest feature in a robot is to be able to control it with your smartphone. Building a remote controlled robot can be easily achieved using Arduino and a Bluetooth module.
Material
- Mobile Robot Rovy
- 4x TTGM
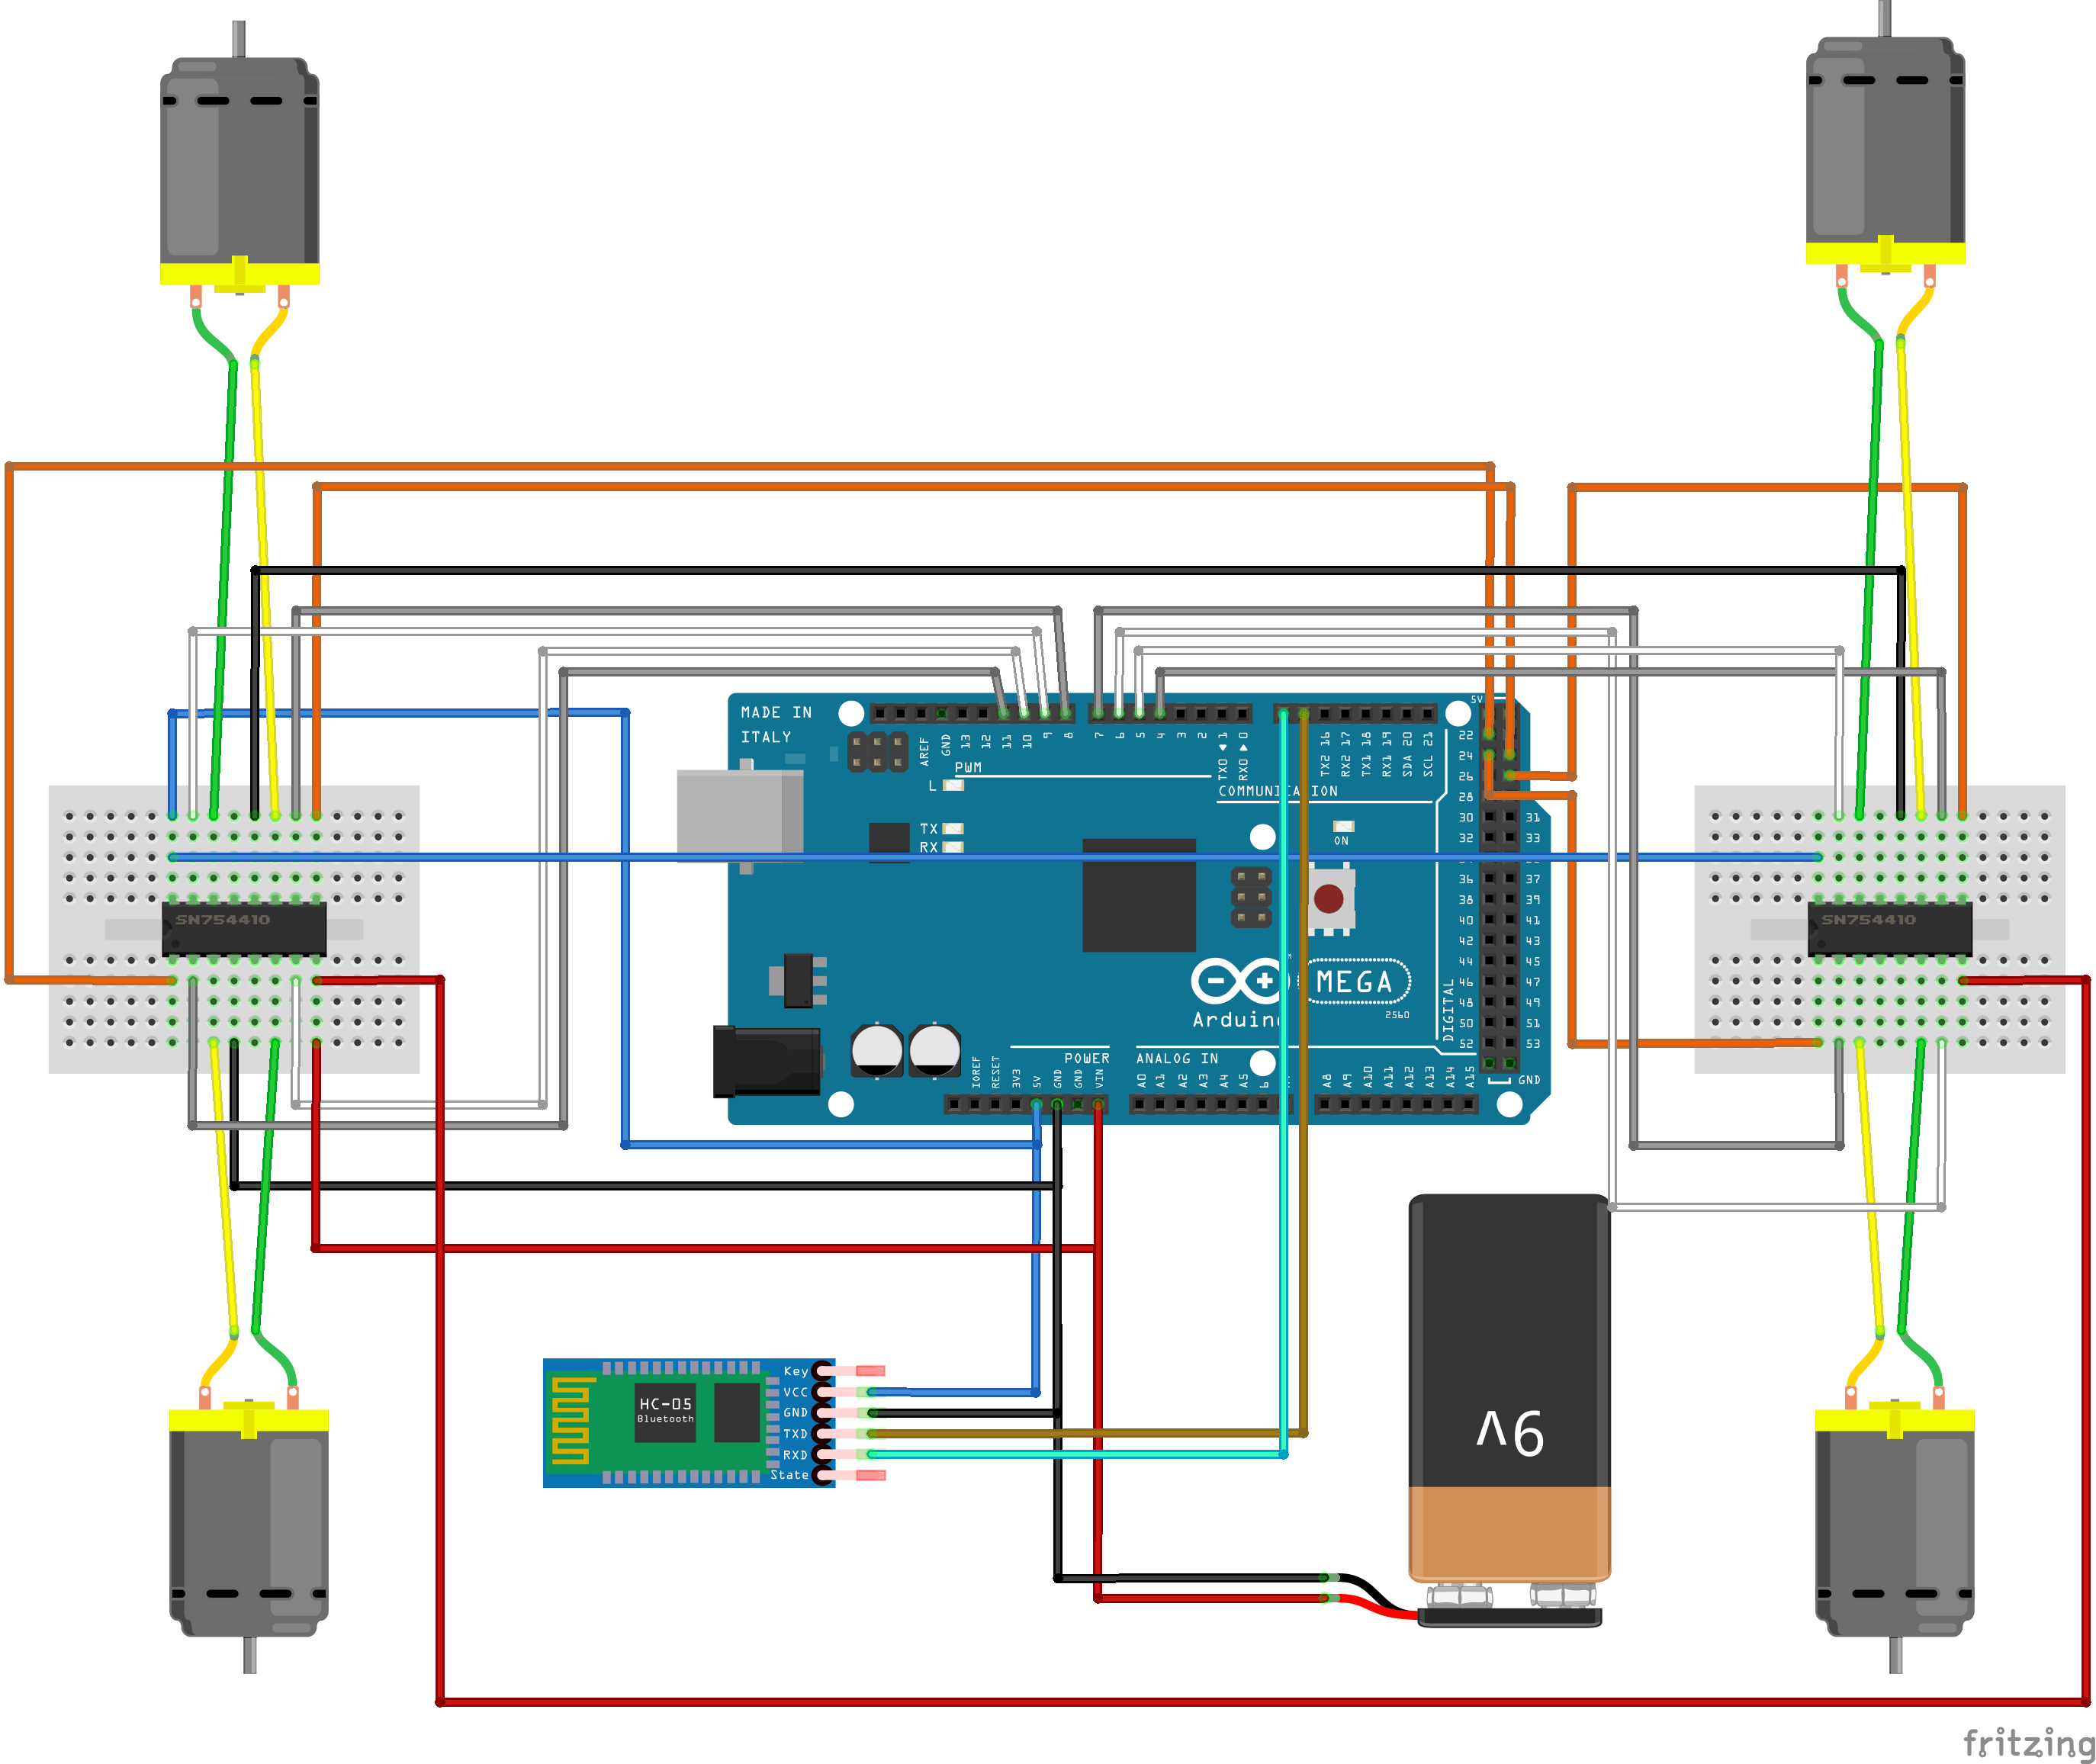
- DC Motor driver (here we use a Arduino Mega prototyping shield and 2xHBridge SN754410)
- Battery 7,4V
- Bluetooth module HC-06
- Arduino Mega
- Smartphone Android
Structure
In this project, we used a 4-wheeled mobile robot Rovy but this project can be applied to any programmable mobile robot.

Hardware
- Board
The board need to have enough inputs/outputs to drive 4 DC motors with H-bridge. Here we used an Arduino Mega but an UNO would be enough.
- DC motor driver
To be able to control the speed and direction of a DC motor, H-bridges are usually used such as SN754410.
- HC-06
To communicate with the robot we need a serial port. We could use a USB cable to control the robot from the computer but as the robot is mobile it is much nicer to use a wireless device.
Schematics

Interface
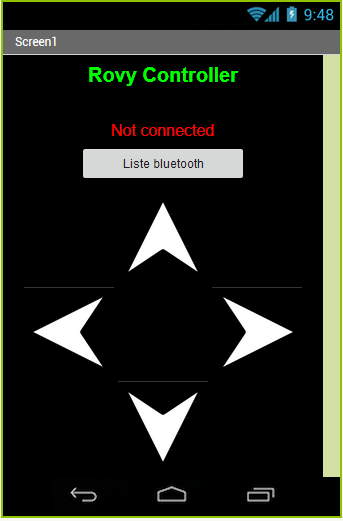
A simple smartphone interface can be created using Processing or App Inventor 2. The interface has four buttons that represent directions of the robot and one button to select the Bluetooth device. You can download the App project on this link.

When pushing on a button a corresponding command is sent via Bluetooth.
|
Button |
Command |
Movement |
|
Upper Arrow |
“F” |
Forward |
|
Left Arrow |
“L” |
Turn left |
|
Right Arrow |
“R” |
Turn right |
|
Lower Arrow |
“B” |
Backward |
|
“S” |
Stop |
If no button is pressed then the interface send the command “S” (Stop).
Software
The software can be devided in simpler steps: Reading command from bluetooth, select robot functionnality depending on the command and apply motors control depending on the functionnality.
Read the command from the bluetooth module
To learn how to connect and to use HC-06 check this page.
  if (Serial3.available()>=MESSAGE_BYTES)
   { // If data is available to read
    delay(3);
    if( Serial3.read() == HEADER)
    {
     state = (char)Serial3.read(); // read it and store it in val
    }
   }
   Serial.print("Recieved : ");
   Serial.println(state);
Select robot function depending on received command
Note on Arduino code and keayword switch.
   movementEnable();
   switch(state){
     case 'F':
      GoForward(Power);
      Serial.println("Robot walking");
      break;
    case 'B':
      GoBackward(Power);
      Serial.println("Robot backing");
      break;
    case 'R':
      TurnRight(Power);
      Serial.println("turn right");
      break;
    case 'L':
      TurnLeft(Power);
      Serial.println("turn left");
      break;
    default://S
      Stop();
      Serial.println("resting");
    break;
  }
Control DC Motors to perform the selected movement
Learn how to drive a DC motor here.
void movementEnable(){
    digitalWrite(enableBridge1,HIGH);
    digitalWrite(enableBridge2,HIGH);
    digitalWrite(enableBridge3,HIGH);
    digitalWrite(enableBridge4,HIGH);
}

void movementDisable(){
    digitalWrite(enableBridge1,LOW);
    digitalWrite(enableBridge2,LOW);
    digitalWrite(enableBridge3,LOW);
    digitalWrite(enableBridge4,LOW);
}


void GoForward(int Power){
  analogWrite(MotorForward1,Power);
  analogWrite(MotorReverse1,0);
  analogWrite(MotorForward2,Power);
  analogWrite(MotorReverse2,0);
  analogWrite(MotorForward3,Power);
  analogWrite(MotorReverse3,0);
  analogWrite(MotorForward4,Power);
  analogWrite(MotorReverse4,0);
}

void GoBackward(int Power){
  analogWrite(MotorForward1,0);
  analogWrite(MotorReverse1,Power);
  analogWrite(MotorForward2,0);
  analogWrite(MotorReverse2,Power);
  analogWrite(MotorForward3,0);
  analogWrite(MotorReverse3,Power);
  analogWrite(MotorForward4,0);
  analogWrite(MotorReverse4,Power);
}

void TurnRight(int Power){
  analogWrite(MotorForward1,Power);
  analogWrite(MotorReverse1,0);
  analogWrite(MotorForward2,0);
  analogWrite(MotorReverse2,Power);
  analogWrite(MotorForward3,Power);
  analogWrite(MotorReverse3,0);
  analogWrite(MotorForward4,0);
  analogWrite(MotorReverse4,Power);
}

void TurnLeft(int Power){
  analogWrite(MotorForward1,0);
  analogWrite(MotorReverse1,Power);
  analogWrite(MotorForward2,Power);
  analogWrite(MotorReverse2,0);
  analogWrite(MotorForward3,0);
  analogWrite(MotorReverse3,Power);
  analogWrite(MotorForward4,Power);
  analogWrite(MotorReverse4,0);
}

void Stop(){
  analogWrite(MotorForward1,0);
  analogWrite(MotorReverse1,0);
  analogWrite(MotorForward2,0);
  analogWrite(MotorReverse2,0);
  analogWrite(MotorForward3,0);
  analogWrite(MotorReverse3,0);
  analogWrite(MotorForward4,0);
  analogWrite(MotorReverse4,0);
  movementDisable();
}
Complete code
#include <Servo.h>
#include <SoftwareSerial.h>
//SoftwareSerial HC06(2,3);                              // If board different from Mega
// Motors definition
const int enableBridge1 = 22;
const int enableBridge2 = 23;
const int enableBridge3 = 24;
const int enableBridge4 = 25;

const int MotorForward1 = 11;
const int MotorReverse1 = 10;
const int MotorForward2 = 8;
const int MotorReverse2 = 9;
const int MotorForward3 = 7;
const int MotorReverse3 = 6;
const int MotorForward4 = 4;
const int MotorReverse4 = 5;

//Serial port
#define HEADER        '|'
#define MESSAGE_BYTES  2  // the total bytes in a message
char state='S';

// Parameters
int Power = 80; //Motor velocity


/******************************************************************\
* PRIVATE FUNCTION: setup
*
* PARAMETERS:
* ~ void
*
* RETURN:
* ~ void
*
* DESCRIPTIONS:
* Initiate inputs/outputs
*
\******************************************************************/

void setup(){
  Serial3.begin(9600);
  Serial.begin(9600);
  delay(500);
}

/******************************************************************\
* PRIVATE FUNCTION: loop
*
* PARAMETERS:
* ~ void
*
* RETURN:
* ~ void
*
* DESCRIPTIONS:
* Main Function of the code
\******************************************************************/

void loop(){

  if (Serial3.available()>=MESSAGE_BYTES)
   { // If data is available to read
    delay(3);
    if( Serial3.read() == HEADER)
    {
     state = (char)Serial3.read(); // read it and store it in val
    }
   }
   Serial.print("Recieved : ");
   Serial.println(state);

   movementEnable();
   switch(state){
     case 'F':
      GoForward(Power);
      Serial.println("Robot walking");
      break;
    case 'B':
      GoBackward(Power);
      Serial.println("Robot backing");
      break;
    case 'R':
      TurnRight(Power);
      Serial.println("turn right");
      break;
    case 'L':
      TurnLeft(Power);
      Serial.println("turn left");
      break;
    default://S
      Stop();
      Serial.println("resting");
    break;
  }

}


/******************************************************************\
* PRIVATE FUNCTION: movementEnable
*
* PARAMETERS:
* ~ void
*
* RETURN:
* ~ void
*
* DESCRIPTIONS:
*   Enable motor control
\*****************************************************************/
void movementEnable(){
    digitalWrite(enableBridge1,HIGH);
    digitalWrite(enableBridge2,HIGH);
    digitalWrite(enableBridge3,HIGH);
    digitalWrite(enableBridge4,HIGH);
}

void movementDisable(){
    digitalWrite(enableBridge1,LOW);
    digitalWrite(enableBridge2,LOW);
    digitalWrite(enableBridge3,LOW);
    digitalWrite(enableBridge4,LOW);
}

/******************************************************************\
* PRIVATE FUNCTION: GoForward
*
* PARAMETERS:
* ~ int Power motor velocity
*
* RETURN:
* ~ void
*
* DESCRIPTIONS:
*
\*****************************************************************/


void GoForward(int Power){
  analogWrite(MotorForward1,Power);
  analogWrite(MotorReverse1,0);
  analogWrite(MotorForward2,Power);
  analogWrite(MotorReverse2,0);
  analogWrite(MotorForward3,Power);
  analogWrite(MotorReverse3,0);
  analogWrite(MotorForward4,Power);
  analogWrite(MotorReverse4,0);
}

/******************************************************************\
* PRIVATE FUNCTION: GoBackward
*
* PARAMETERS:
* ~ int Power motor velocity
*
* RETURN:
* ~ void
*
* DESCRIPTIONS:
*
\*****************************************************************/

void GoBackward(int Power){
  analogWrite(MotorForward1,0);
  analogWrite(MotorReverse1,Power);
  analogWrite(MotorForward2,0);
  analogWrite(MotorReverse2,Power);
  analogWrite(MotorForward3,0);
  analogWrite(MotorReverse3,Power);
  analogWrite(MotorForward4,0);
  analogWrite(MotorReverse4,Power);
}

/******************************************************************\
* PRIVATE FUNCTION: TurnRight
*
* PARAMETERS:
* ~ int Power motor velocity
*
* RETURN:
* ~ void
*
* DESCRIPTIONS:
*
\*****************************************************************/

void TurnRight(int Power){
  analogWrite(MotorForward1,Power);
  analogWrite(MotorReverse1,0);
  analogWrite(MotorForward2,0);
  analogWrite(MotorReverse2,Power);
  analogWrite(MotorForward3,Power);
  analogWrite(MotorReverse3,0);
  analogWrite(MotorForward4,0);
  analogWrite(MotorReverse4,Power);
}

void TurnLeft(int Power){
  analogWrite(MotorForward1,0);
  analogWrite(MotorReverse1,Power);
  analogWrite(MotorForward2,Power);
  analogWrite(MotorReverse2,0);
  analogWrite(MotorForward3,0);
  analogWrite(MotorReverse3,Power);
  analogWrite(MotorForward4,Power);
  analogWrite(MotorReverse4,0);
}

void Stop(){
  analogWrite(MotorForward1,0);
  analogWrite(MotorReverse1,0);
  analogWrite(MotorForward2,0);
  analogWrite(MotorReverse2,0);
  analogWrite(MotorForward3,0);
  analogWrite(MotorReverse3,0);
  analogWrite(MotorForward4,0);
  analogWrite(MotorReverse4,0);
  movementDisable();
}
Results
If you want more information on this project do not hesitate to leave a comment or to send us a message.
Sources
Learn how to program with Arduino
Drive a DC motor using Arduino
https://www.aranacorp.com/en/control-a-dc-motor-with-arduino/


