, , ,
In this tutorial, we’ll look at how to stream video from a PiCam on a Raspberry Pi to a web browser. When a camera is connected to a Raspberry Pi, it’s important to be able to access it from anywhere. To do this, you need to set up a server and send a capture of the video to its interface. This makes it possible to stream video from the Raspberry Pi to a web browser or other application.
Hardware
- Computer
- Raspberry Pi
- PiCamV2
N.B.: this tutorial can be applied to any computer running Python and equipped with a webcam.
Raspberry Pi configuration
Configure PiCamV2 on your Raspberry Pi
First of all, we’re going to install Flask, which will enable us to set up the server and serve the video.
sudo apt-get install python3-flaskNext, we use OpenCV to capture and process the images.
pip3 install opencv-pythonCode for broadcasting a video on a server
To broadcast the video from the Raspberry Pi, we’ll set up a directory containing
- a static folder containing css and javascript files
- a templates folder containing html files
- the python script
Creating an html page .
<!DOCTYPE html>
<head>
<title>PiCam Server</title>
<link rel="stylesheet" href='../static/style.css'/>
</head>
<body>
<h1>PiCam Live Streaming</h1>
<div class="img-container">
<img src="{{ url_for('video_feed') }}">
</div>
<footer>AranaCorp All right reserved ©</footer>
</body>
</html>Creating a style page ./static/style.css
body{
background-color:#70706F;
}

h1{
	color:#3AAA35;
	text-align:center;
}


.img-container{
  	width:50%;
	border: 3px solid #3AAA35;
	border-radius: 6px;
	overflow: hidden;
	text-align:center;
	margin-left: auto;
	margin-right: auto;
	padding:20px;
}
img{
  width:100%;
}
footer{
  background-color: #777;
  padding: 10px;
  text-align: center;
  color: white;
}
Code to stream video PiCamServer.py
#111!/usr/bin/env python
# -*- coding: utf-8 -*

#sudo apt-get install python3-flask
#pip3 install opencv-python

from flask import Flask, render_template, Response
import cv2

app = Flask(__name__)
#app.config["CACHE_TYPE"] = "null"

@app.route('/')
def index():
	"""Video streaming home page."""
	return render_template('index.html')

def gen():
	"""Video streaming generator function."""
	vs = cv2.VideoCapture(0)
	while True:
		ret,frame=vs.read()
		ret, jpeg = cv2.imencode('.jpg', frame)
		frame=jpeg.tobytes()
		yield (b'--frame\r\n'
		b'Content-Type: image/jpeg\r\n\r\n' + frame + b'\r\n')

	vs.release()
	cv2.destroyAllWindows()

@app.route('/video_feed')
def video_feed():
	"""Video streaming route. Put this in the src attribute of an img tag."""
	return Response(gen(),mimetype='multipart/x-mixed-replace; boundary=frame')

if __name__ == '__main__':
	app.run(host='0.0.0.0', port =5000, debug=True, threaded=True)
In this code, we open a server flask on port 5000 and on the local address
app.run(host='0.0.0.0', port =5000, debug=True, threaded=True)We acquire the video in the gen() function, which we call in the video_feed() function.
When we make a request to the browser’s IP address, the script will call the index() function under app.route(‘
Once the page has loaded, the tag calls the /video_feed url, which launches the function of the same name.
Recover the IP address of your Raspberry Pi
Before running the code, you need to retrieve the IP address of your Raspberry Pi using the ifconfig command in the terminal.
ifconfig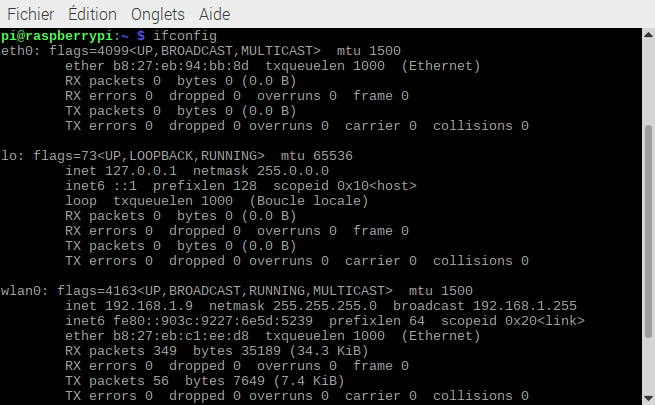
Results
You can then run the code via Geany or the command line in the working directory
python3 PiCamServer.pyIn your browser, enter the IP address of your Raspberry Pi and the port linked to the server to display the video (here: 192.162.1.46:5000).


TL;DR: it didn’t work 🙂
It’s an interesting starting point for investigation.
I was trying to get this up and running on a Raspberry PI Zero W with the recent bookworm distribution.
The main script couldn’t find the index.html file. I had to change the line to
app = Flask(__name__, template_folder=’./’)
to get it up.
Then I ran into a GStreamer error. I didn’t realize that this was a dependency for this example. I ran the following command:
sudo apt-get install gstreamer1.0-tools gstreamer1.0-plugins-base gstreamer1.0-plugins-good gstreamer1.0-plugins-bad gstreamer1.0-plugins-ugly
I gave up after this list of errors:
[ WARN:0@32.745] global ./modules/videoio/src/cap_gstreamer.cpp (2401) handleMessage OpenCV | GStreamer warning: Embedded video playback halted; module v4l2src0 reported: Failed to allocate required memory.
[ WARN:0@32.756] global ./modules/videoio/src/cap_gstreamer.cpp (1356) open OpenCV | GStreamer warning: unable to start pipeline
[ WARN:0@32.760] global ./modules/videoio/src/cap_gstreamer.cpp (862) isPipelinePlaying OpenCV | GStreamer warning: GStreamer: pipeline have not been created
thanks a lot for the feedback. I’ll look into it when I have time.
Seems to be a memory error
pip will not run on Pi OS now. error: externally-managed-environment
Used a python virtual system in which to run pip. It says the installation was successful, but cv2 is never recognized recognized. I tried opencv-python and opencv-contrib-python.
run it in venv then
Ignore my previous post. I see what’s going on now. It’s the dumbest thing I’ve ever encountered.
I now see you found out about venv (next time, mention it, it will help those with similar issues)