In this tutorial, we’ll look at how to stream video from a Raspberry Pi using Gstreamer. One of the most widely used streaming tools is FFMPEG. We’ll be testing gstreamer here, as there’s less transmission delay.
Previous streaming tutorial: Video streaming between two machines with FFMPEG
Hardware
- Raspberry Pi with Raspbian
- USB Cam or RPiCam
Installing Gstreamer on Raspberry Pi
Part of Gstreamer is installed by default on Raspbian. We’ll simply complete the installation with a few additional libraries.
# install a missing dependency
$ sudo apt-get install libx264-dev libjpeg-dev
# install the remaining plugins
$ sudo apt-get install libgstreamer1.0-dev \
     libgstreamer-plugins-base1.0-dev \
     libgstreamer-plugins-bad1.0-dev \
     gstreamer1.0-plugins-ugly \
     gstreamer1.0-tools \
     gstreamer1.0-gl \
     gstreamer1.0-gtk3
# if you have Qt5 install this plugin
$ sudo apt-get install gstreamer1.0-qt5
# install if you want to work with audio
$ sudo apt-get install gstreamer1.0-pulseaudio
To test the installation, enter the following command
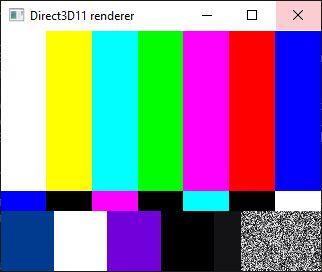
gst-launch-1.0 videotestsrc ! videoconvert ! autovideosink
Find available video and audio devices
gst-device-monitor-1.0
Video streaming with Gstreamer
Once you have the device name, you can start the stream with the command
gst-launch-1.0 v4l2src device=/dev/video0 ! video/x-raw, width=640, height=480, framerate=30/1 ! videoconvert ! videoscale ! clockoverlay time-format="%D %H:%M:%S" ! autovideosink
We send the video stream using the UDP protocol from a Raspberry Pi
gst-launch-1.0 v4l2src device=/dev/video0 num-buffers=-1 ! video/x-raw, width=640, height=480, framerate=30/1 ! clockoverlay time-format="%D %H:%M:%S" ! videoconvert ! jpegenc ! udpsink host=192.168.1.70 port=5200
We receive the UDP stream from the client (192.168.1.70) using the command
gst-launch-1.0 udpsrc port=5200 ! jpegdec ! videoconvert ! autovideosink
To save the video stream as a file
gst-launch-1.0 -e v4l2src device=/dev/video0 num-buffers=-1 ! 'image/jpeg,framerate=30/1,width=640,height=480' ! queue ! avimux ! filesink location=video.avi
Installing Gstreamer on Windows
To receive the video stream from the Raspberry Pi, we use a Windows computer. You can use any other device (RPi, Android, iOS, macOS).
For your information, Gstreamer is installed on Windows using an msi installer available on the site.
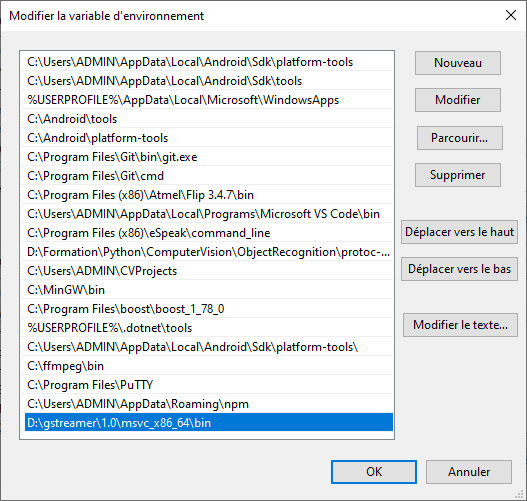
After downloading and installing Gstreamer, you need to add the folder C:\gstreamer\1.0\msvc_x86_64\bin to the Path environment variable.
To test the installation, enter the following command
gst-launch-1.0 videotestsrc ! videoconvert ! autovideosink
To stream a video from the camera
gst-launch-1.0 mfvideosrc ! video/x-raw, width=1280, height=720, framerate=30/1 ! videoconvert ! videoscale ! clockoverlay time-format="%D %H:%M:%S" ! video/x-raw, width=640, height=360 ! autovideosink
It is possible to launch a stream using the UDP protocol
gst-launch-1.0 mfvideosrc ! video/x-raw, width=1280, height=720, framerate=30/1 ! videoconvert ! videoscale ! clockoverlay time-format="%D %H:%M:%S" ! video/x-raw, width=640, height=360 ! jpegenc ! udpsink host=192.168.1.92 port=5200
We receive the UDP stream from the client (192.168.1.92) with the command
gst-launch-1.0 udpsrc port=5200 ! jpegdec ! videoconvert ! autovideosink
Installing Gstreamer on Ubuntu or Debian
To get the most out of Gstreamer, we’ll need the v4l2 library
sudo apt install v4l-utils
In a terminal, enter the following commands to install gstreamer.
sudo apt-get install libgstreamer1.0-dev libgstreamer-plugins-base1.0-dev libgstreamer-plugins-bad1.0-dev gstreamer1.0-plugins-base gstreamer1.0-plugins-good gstreamer1.0-plugins-bad gstreamer1.0-plugins-ugly gstreamer1.0-libav gstreamer1.0-tools gstreamer1.0-x gstreamer1.0-alsa gstreamer1.0-gl gstreamer1.0-gtk3 gstreamer1.0-qt5 gstreamer1.0-pulseaudio
To test the installation, enter the following command
gst-launch-1.0 videotestsrc ! videoconvert ! autovideosink
To launch the video stream from Ubuntu, you can run the following command
gst-launch-1.0 v4l2src name="/dev_video0" ! decodebin ! videoconvert ! videoscale ! clockoverlay time-format="%D %H:%M:%S" ! video/x-raw,format=RGB ! queue ! videoconvert !
N.B.: don’t forget to add decodebin
It is possible to launch a stream using the UDP protocol
gst-launch-1.0 v4l2src name="/dev_video0" num-buffers=-1 ! decodebin ! videoconvert ! videoscale ! clockoverlay time-format="%D %H:%M:%S" ! video/x-raw,format=RGB ! queue ! videoconvert ! jpegenc ! udpsink host=192.168.1.70 port=5200
We receive the UDP stream from the client (192.168.1.70) using the command
gst-launch-1.0 udpsrc port=5200 ! jpegdec ! videoconvert ! autovideosink
Sources
- GStreamer downloads
- Qengineering ref


