To control a motor, whether stepping or direct current, with a Raspberry Pi, it is necessary to add an integrated circuit like an H-bridge. To simplify the assemblies, there are shields like for Arduino , called HAT (hat) at Raspberry. We will see how to communicate with MotorHAT.
Prerequisite: Program with Raspberry Pi
Material
- Screen
- HDMI cable
- Keyboard
- Raspberry PI 3 (with OS on micro SD)
- Mouse
- Micro USB charger B
- Adafruit MotorHat
- DC motor
Presentation of MotorHat
The MotorHat uses TB6612 mosfets to control the current in the motors. It uses I2C communication to interface with the Raspberry PI and thus save I / O. It is compatible with all Raspberry Pi cards.
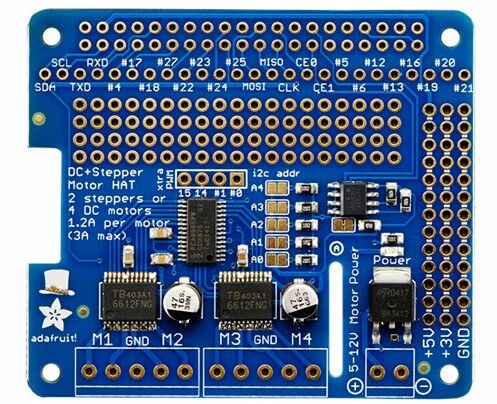
- Digital pin SCL/BCM3: Communication I2C Serial Clock Line
- Digital pin SDA/BCM2: Communication I2C Serial Data Line
The MotorHat has a jumper to select the I2C address and is stackable. This allows you to drive up to 32 shields (i.e. 64 steppers or 128 DC motors) with a single Arduino board.
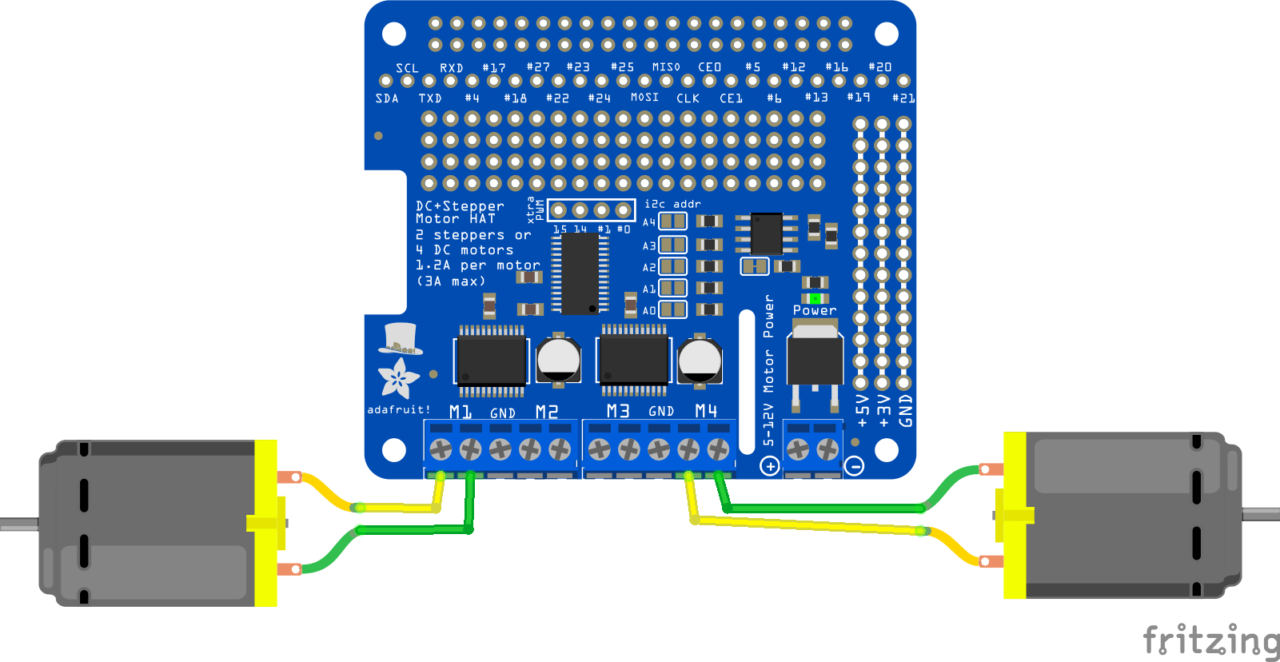
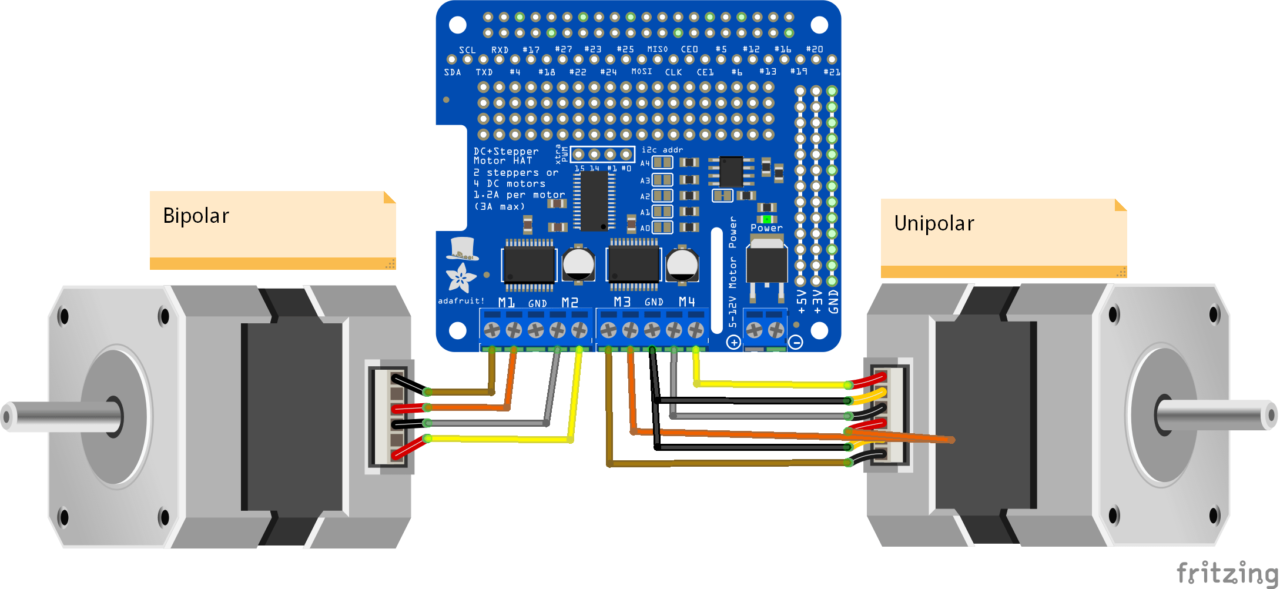
Wiring schematics
Compatible with Raspberry Pi cards, the HAT is placed directly on the pins of the Raspberry Pi. The power supply is connected to the Power terminal block. The motors are connected to terminal blocks M1 to M4. You may have to connect three types of motor:
– DC motor
– unipolar stepper motor
– bipolar stepper motor
The connections of these motors are detailed in the following diagrams.
Raspberry Pi configuration
To be able to communicate with the MotorHAT, you must authorize the Raspberry Pi to use I2C communication. On the desktop, in the Preferences menu, open the Raspberry Pi Configuration menu. Under the Interfaces tab, select Enabled for I2C, then Validate.
Or in a terminal, type “sudo raspi-config”, in “5 Interfacing Options”, select “P5 I2C”, then validate.
Basic code for controlling a DC motor
To communicate with MotorHat, we will use the Adafruit_MotorHAT library.
#!/usr/bin/python
#i2c 0x60 0x70

from Adafruit_MotorHAT import Adafruit_MotorHAT,Adafruit_DCMotor

import time
import atexit

mh=Adafruit_MotorHAT(addr=0x60)
MAX_SPEED=150

def turnOffMotors():
    mh.getMotor(1).run(Adafruit_MotorHAT.RELEASE)
    mh.getMotor(2).run(Adafruit_MotorHAT.RELEASE)
    mh.getMotor(3).run(Adafruit_MotorHAT.RELEASE)
    mh.getMotor(4).run(Adafruit_MotorHAT.RELEASE)

atexit.register(turnOffMotors)

motor=mh.getMotor(1)

while True:
 print("Forward \n")
 motor.run(Adafruit_MotorHAT.FORWARD)
 print("Speed up \n")
 for i in range(MAX_SPEED):
 motor.setSpeed(i)
 time.sleep(0.01)

 print("Speed down \n")
 for i in reversed(range(MAX_SPEED)):
 motor.setSpeed(i)
 time.sleep(0.01)

 print("Backward\n")
 motor.run(Adafruit_MotorHAT.BACKWARD)
 print "Speed up \n"
 for i in range(MAX_SPEED):
 motor.setSpeed(i)
 time.sleep(0.01)

 print("Speed down \n")
 for i in reversed(range(MAX_SPEED)):
 motor.setSpeed(i)
 time.sleep(0.01)

 print("STOP \n")
 motor.run(Adafruit_MotorHAT.RELEASE)
 time.sleep(2)
In this example, a stop function is defined with the atexit object. This ensures that the engines are cut when exiting the Python script.
Basic code for controlling a stepper motor
To use a stepper, you must retrieve the Stepper object defined in Adafruit_MotorHAT.
#!/usr/bin/python
#import Adafruit_MotorHAT, Adafruit_DCMotor, Adafruit_Stepper
from Adafruit_MotorHAT import Adafruit_MotorHAT, Adafruit_DCMotor, Adafruit_StepperMotor

import time
import atexit

# create a default object, no changes to I2C address or frequency
mh = Adafruit_MotorHAT()

# recommended for auto-disabling motors on shutdown!
def turnOffMotors():
    mh.getMotor(1).run(Adafruit_MotorHAT.RELEASE)
    mh.getMotor(2).run(Adafruit_MotorHAT.RELEASE)
    mh.getMotor(3).run(Adafruit_MotorHAT.RELEASE)
    mh.getMotor(4).run(Adafruit_MotorHAT.RELEASE)

atexit.register(turnOffMotors)

myStepper = mh.getStepper(200, 1)  # 200 steps/rev, motor port #1
myStepper.setSpeed(30)             # 30 RPM

while (True):
    print("Single coil steps")
    myStepper.step(100, Adafruit_MotorHAT.FORWARD,  Adafruit_MotorHAT.SINGLE)
    myStepper.step(100, Adafruit_MotorHAT.BACKWARD, Adafruit_MotorHAT.SINGLE)

    print("Double coil steps")
    myStepper.step(100, Adafruit_MotorHAT.FORWARD,  Adafruit_MotorHAT.DOUBLE)
    myStepper.step(100, Adafruit_MotorHAT.BACKWARD, Adafruit_MotorHAT.DOUBLE)

    print("Interleaved coil steps")
    myStepper.step(100, Adafruit_MotorHAT.FORWARD,  Adafruit_MotorHAT.INTERLEAVE)
    myStepper.step(100, Adafruit_MotorHAT.BACKWARD, Adafruit_MotorHAT.INTERLEAVE)

    print("Microsteps")
    myStepper.step(100, Adafruit_MotorHAT.FORWARD,  Adafruit_MotorHAT.MICROSTEP)
    myStepper.step(100, Adafruit_MotorHAT.BACKWARD, Adafruit_MotorHAT.MICROSTEP
NB: Pay attention to indentations when writing or copying a code. You may have compilation errors.
You can take inspiration from these examples to control your system composed of DC motors or stepper motors with Raspberry Pi. Do not hesitate to leave us a comment or a message if you encounter difficulties in controlling your motors with Raspberry Pi.
Applications
- Control a robot with several DC or stepper motors
Sources
- La THE référence https://www.raspberrypi.org/help/
- Program with Raspberry Pi
Find other examples and tutorials in our Automatic code generator
Code Architect


