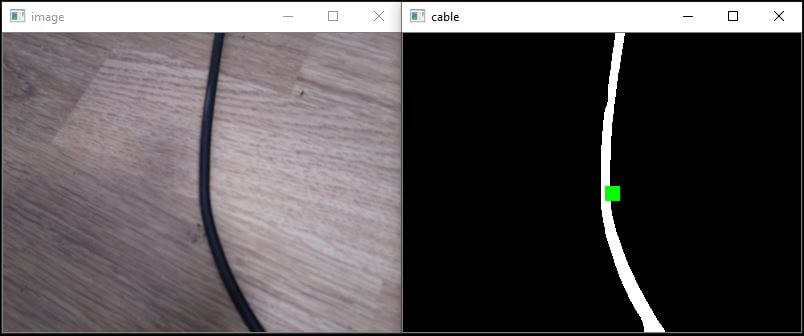
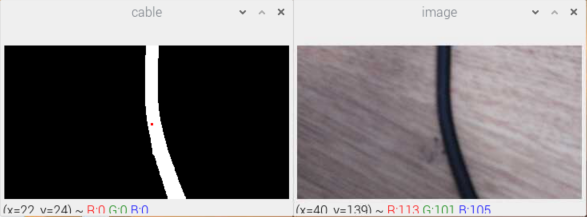
An interesting application in robotics is pattern recognition. In this tutorial we are going to use the OpenCV library in a Python code that will allow us to detect a cable at its centre. In order to achieve this line tracking we will perform image processing with OpenCV.
This will then allow you to make your regulation to always keep the centre of the line in the middle of the camera and thus follow the trajectory! We have decided to do this tutorial on the Raspberry Pi as the purpose of this tutorial is to perform image processing for a robot using the Pi Camera.
Material
- A Raspberry Pi (or computer)
- A monitor, keyboard and mouse or remote control via VNC
Configuration
- Install OpenCV on Raspberry Pi
- A photo of a cable or black line (by default download the photo below to work on the same example, it was taken with the Pi Camera)

Code
To start with, so that you can reuse the detection of a line or a cable on a video (succession of images), we will implement a Class. This class will take as a parameter the path of the image. By default, if the image is in the same folder as the code, it will suffice to enter the name of the image, for example: “cam.jpg”).
Then save the python code below in a file named: suivi_ligne.py
# -*- coding: utf-8 -*-
"""
@author: AranaCorp
"""
import cv2
import time
import numpy as np
import matplotlib.pyplot as plt


class LineTracking():
	"""
	Classe permettant le traitement d'image, la délimitation d'un contour et permet de trouver le centre de la
	forme detectée
	"""
	def __init__(self,img_file):
		"""The constructor."""
		self.img = cv2.imread(img_file)
		self.img_inter = self.img
		self.img_final = self.img
		self.cendroids = []
		self.mean_centroids = [0,0]

	def processing(self):
		"""Méthode permettant le traitement d'image"""
		#self.img=cv2.resize(self.img,(int(self.img.shape[1]*0.2),int(self.img.shape[0]*0.2))) #redimensionner l'image d'origine
		print(self.img.shape)
		#self.img = self.img[199:391, 149:505] #on recentre l'image en excluant les zones extérieures afin d'avoir une plus grande précision pour la suite
		gray = cv2.cvtColor(self.img, cv2.COLOR_BGR2GRAY) #on passe l'image en nuances de gris
		blur = cv2.GaussianBlur(gray,(5,5),0) #on floute l'image
		ret,thresh = cv2.threshold(blur,60,255,cv2.THRESH_BINARY_INV) #on binarise l'image

		self.img_inter=thresh
		"""Une ouverture permet d'enlever tous les élements qui sont plus petits que l'élement structurant (ou motif)
		Une fermeture permet de "combler" les trous qui ont une taille inférieur à l'élement structurant """
		kernel_open = cv2.getStructuringElement(cv2.MORPH_ELLIPSE,(5,5)) #on créé l'élement structurant de l'ouverture
		kernel_close = cv2.getStructuringElement(cv2.MORPH_ELLIPSE,(10,10)) #on créé l'élement structurant de la fermeture

		thresh = cv2.morphologyEx(thresh, cv2.MORPH_OPEN, kernel_open) #on fait une ouverture suivant un motif
		thresh = cv2.morphologyEx(thresh, cv2.MORPH_CLOSE, kernel_close) #on fait une fermeturesuivant un motif

		connectivity = 8

		output = cv2.connectedComponentsWithStats(thresh, connectivity, cv2.CV_32S) #permet de délimiter une forme
		num_labels = output[0]
		labels = output[1]
		stats = output[2]
		self.centroids = output[3] #donne les centres de la ou des formes de l'image

		for c in self.centroids :
			"""Permet de faire la moyenne des centres de la forme, en effet sur l'image test,
			   il y a deux centres qui sont très proches et la moyenne de deux convient.
			   On pourra imaginer que dans un cas général on modifie cela
			"""
			self.mean_centroids[0] += c[0]/len(self.centroids)
			self.mean_centroids[1] += c[1]/len(self.centroids)

		self.img_final = cv2.cvtColor(thresh, cv2.COLOR_GRAY2BGR)

		#permet de rajouter un carré rouge à l'endroit du centre de la forme
		#self.img_final[int(self.mean_centroids[1])-10 : int(self.mean_centroids[1])+20, int(self.mean_centroids[0])-10 : int(self.mean_centroids[0])+20] = [0,0,255]
		for c in self.centroids :
			self.img_final[int(c[1])-5 : int(c[1])+10, int(c[0])-5 : int(c[0])+10] = [0,255,0]
Finally, create a new python script, for example: test_tracking.py
if __name__ == '__main__' :
	test = LineTracking('cam.png') #créer un objet LineTracking qui est la Classe créée au dessus .png ou .jpg
	test.processing() #lance le traitement d'image
	while True :
		cv2.imshow('image',test.img) #affiche l'image original après redimensionnement
		#cv2.imshow('process',test.img_inter ) #affiche l'image après traitement
		cv2.imshow('cable',test.img_final) #affiche l'image après traitement
		key= cv2.waitKey(1);
		if  key == ord(' '): #pour fermer les fenêtres appuyer sur la barre 'espace'
			break
	cv2.destroyAllWindows()
You now have all the codes to test your image processing. Issue the command :
python3 test_tracking.pyResult
Two windows open with the original image and the processed image. You can see that a green square marks the position of the cable. This point can be used to direct a robot or a mobile camera.

To stop the display press the space bar.
To conclude, the processing has just been done on an image. You can now implement it in a processing loop for a video.
Applications
You can now use the LineTracking class in your main file which opens the Raspberry camera. For more information on how to install a PiCam on a Raspberry Pi you can follow our tutorial.
