In this tutorial, we’ll train a MobileNetV2 TensorFlow model with Keras so that it can be applied to our problem. We’ll then be able to use it in real time to classify new images.
For this tutorial, we assume that you have followed the previous tutorials: using a TensorFlow model and preparing a database for training.
N.B.: I couldn’t find the right way to train the mobilenetV2 ssd model, as it is, with tensorflow. So I switched to Yolo. If you have the right method, don’t hesitate to leave a comment.
Recover an image database
Download one of the many image databases, such as cats-and-dogs, or create your own.
Unzipped the folder under Tensorflow>data
Model drive
To train the model, you can use the following script:
- load and expand the database
- create a model from the MobileNetV2 model(base_model)
- drive new model gains
- fine-tune base_model gains
import matplotlib.pyplot as plt
import numpy as np
import os
import tensorflow as tf
#_URL = 'https://storage.googleapis.com/mledu-datasets/cats_and_dogs_filtered.zip'
#path_to_zip = tf.keras.utils.get_file('cats_and_dogs.zip', origin=_URL, extract=True)
#PATH = os.path.join(os.path.dirname(path_to_zip), 'cats_and_dogs_filtered')
PATH="./data/cats_and_dogs_filtered"
train_dir = os.path.join(PATH, 'train')
validation_dir = os.path.join(PATH, 'validation')
BATCH_SIZE = 32
IMG_SIZE = (160, 160)
#create train and validation sets
train_dataset = tf.keras.utils.image_dataset_from_directory(train_dir,
shuffle=True,
batch_size=BATCH_SIZE,
image_size=IMG_SIZE)
validation_dataset = tf.keras.utils.image_dataset_from_directory(validation_dir,
shuffle=True,
batch_size=BATCH_SIZE,
image_size=IMG_SIZE)
class_names = train_dataset.class_names
plt.figure(figsize=(10, 10))
for images, labels in train_dataset.take(1):
for i in range(9):
ax = plt.subplot(3, 3, i + 1)
plt.imshow(images[i].numpy().astype("uint8"))
plt.title(class_names[labels[i]])
plt.axis("off")
val_batches = tf.data.experimental.cardinality(validation_dataset)
test_dataset = validation_dataset.take(val_batches // 5)
validation_dataset = validation_dataset.skip(val_batches // 5)
print('Number of validation batches: %d' % tf.data.experimental.cardinality(validation_dataset))
print('Number of test batches: %d' % tf.data.experimental.cardinality(test_dataset))
#configure performance
AUTOTUNE = tf.data.AUTOTUNE
train_dataset = train_dataset.prefetch(buffer_size=AUTOTUNE)
validation_dataset = validation_dataset.prefetch(buffer_size=AUTOTUNE)
test_dataset = test_dataset.prefetch(buffer_size=AUTOTUNE)
#augmented data (usefull for small data sets)
data_augmentation = tf.keras.Sequential([
tf.keras.layers.RandomFlip('horizontal'),
tf.keras.layers.RandomRotation(0.2),
])
for image, _ in train_dataset.take(1):
plt.figure(figsize=(10, 10))
first_image = image[0]
for i in range(9):
ax = plt.subplot(3, 3, i + 1)
augmented_image = data_augmentation(tf.expand_dims(first_image, 0))
plt.imshow(augmented_image[0] / 255)
plt.axis('off')
preprocess_input = tf.keras.applications.mobilenet_v2.preprocess_input
rescale = tf.keras.layers.Rescaling(1./127.5, offset=-1)
# Create the base model from the pre-trained model MobileNet V2
IMG_SHAPE = IMG_SIZE + (3,)
base_model = tf.keras.applications.MobileNetV2(input_shape=IMG_SHAPE,
include_top=False,
weights='imagenet')
#or load your own
#base_model= tf.saved_model.load("./pretrained_models/ssd_mobilenet_v2_320x320_coco17_tpu-8/saved_model")
image_batch, label_batch = next(iter(train_dataset))
feature_batch = base_model(image_batch)
print(feature_batch.shape)
base_model.trainable = False
base_model.summary()
#classification header
global_average_layer = tf.keras.layers.GlobalAveragePooling2D()
feature_batch_average = global_average_layer(feature_batch)
print(feature_batch_average.shape)
prediction_layer = tf.keras.layers.Dense(1)
prediction_batch = prediction_layer(feature_batch_average)
print(prediction_batch.shape)
#create new neural network based on MobileNet
inputs = tf.keras.Input(shape=(160, 160, 3))
x = data_augmentation(inputs)
x = preprocess_input(x)
x = base_model(x, training=False)
x = global_average_layer(x)
x = tf.keras.layers.Dropout(0.2)(x)
outputs = prediction_layer(x)
model = tf.keras.Model(inputs, outputs)
base_learning_rate = 0.0001
model.compile(optimizer=tf.keras.optimizers.Adam(learning_rate=base_learning_rate),
loss=tf.keras.losses.BinaryCrossentropy(from_logits=True),
metrics=['accuracy'])
initial_epochs = 10
loss0, accuracy0 = model.evaluate(validation_dataset)
print("initial loss: {:.2f}".format(loss0))
print("initial accuracy: {:.2f}".format(accuracy0))
history = model.fit(train_dataset,
epochs=initial_epochs,
validation_data=validation_dataset)
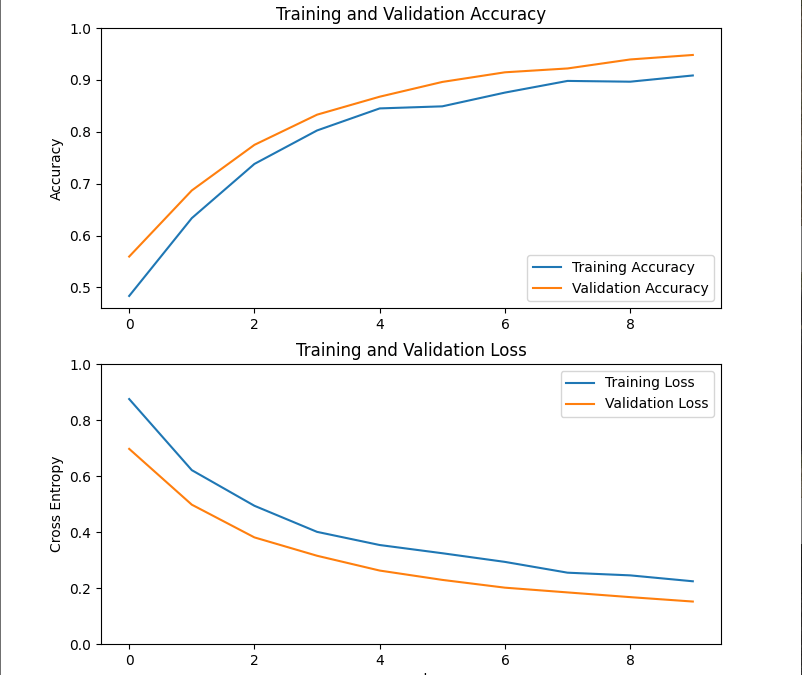
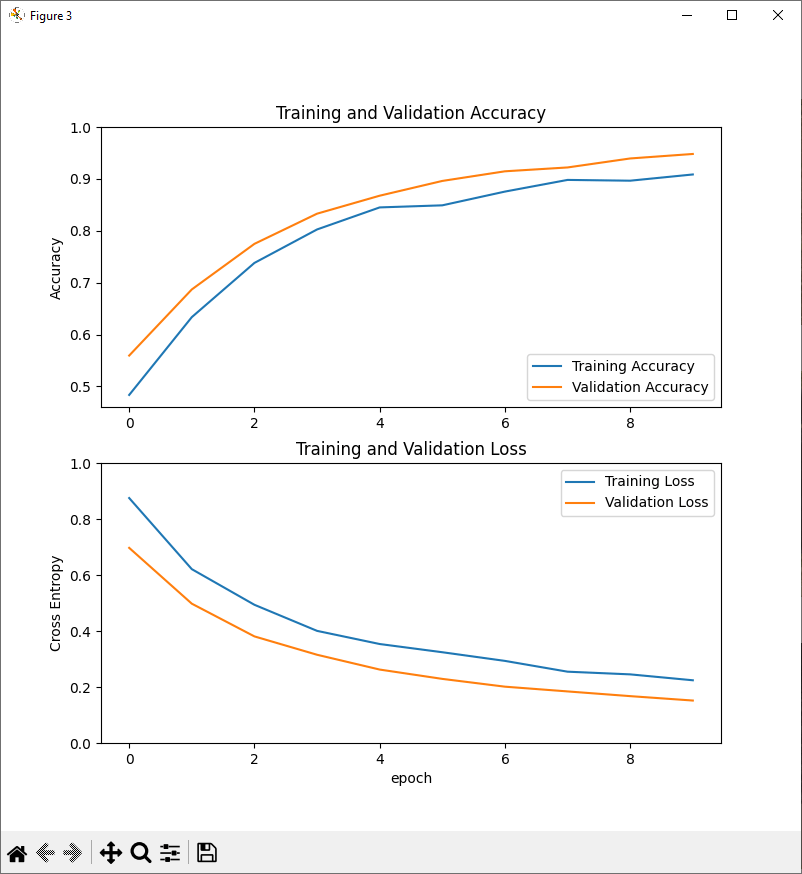
#plot learning curves
acc = history.history['accuracy']
val_acc = history.history['val_accuracy']
loss = history.history['loss']
val_loss = history.history['val_loss']
plt.figure(figsize=(8, 8))
plt.subplot(2, 1, 1)
plt.plot(acc, label='Training Accuracy')
plt.plot(val_acc, label='Validation Accuracy')
plt.legend(loc='lower right')
plt.ylabel('Accuracy')
plt.ylim([min(plt.ylim()),1])
plt.title('Training and Validation Accuracy')
plt.subplot(2, 1, 2)
plt.plot(loss, label='Training Loss')
plt.plot(val_loss, label='Validation Loss')
plt.legend(loc='upper right')
plt.ylabel('Cross Entropy')
plt.ylim([0,1.0])
plt.title('Training and Validation Loss')
plt.xlabel('epoch')
plt.show()
#fine tuning
base_model.trainable = True
# Let's take a look to see how many layers are in the base model
print("Number of layers in the base model: ", len(base_model.layers))
# Fine-tune from this layer onwards
fine_tune_at = 100
# Freeze all the layers before the `fine_tune_at` layer
for layer in base_model.layers[:fine_tune_at]:
layer.trainable = False
model.compile(loss=tf.keras.losses.BinaryCrossentropy(from_logits=True),
optimizer = tf.keras.optimizers.RMSprop(learning_rate=base_learning_rate/10),
metrics=['accuracy'])
model.summary()
fine_tune_epochs = 10
total_epochs = initial_epochs + fine_tune_epochs
history_fine = model.fit(train_dataset,
epochs=total_epochs,
initial_epoch=history.epoch[-1],
validation_data=validation_dataset)
#plot fine learning curves
acc += history_fine.history['accuracy']
val_acc += history_fine.history['val_accuracy']
loss += history_fine.history['loss']
val_loss += history_fine.history['val_loss']
plt.figure(figsize=(8, 8))
plt.subplot(2, 1, 1)
plt.plot(acc, label='Training Accuracy')
plt.plot(val_acc, label='Validation Accuracy')
plt.ylim([0.8, 1])
plt.plot([initial_epochs-1,initial_epochs-1],
plt.ylim(), label='Start Fine Tuning')
plt.legend(loc='lower right')
plt.title('Training and Validation Accuracy')
plt.subplot(2, 1, 2)
plt.plot(loss, label='Training Loss')
plt.plot(val_loss, label='Validation Loss')
plt.ylim([0, 1.0])
plt.plot([initial_epochs-1,initial_epochs-1],
plt.ylim(), label='Start Fine Tuning')
plt.legend(loc='upper right')
plt.title('Training and Validation Loss')
plt.xlabel('epoch')
plt.show()
#evaluate
loss, accuracy = model.evaluate(test_dataset)
print('Test accuracy :', accuracy)
model.save('saved_models/my_model')
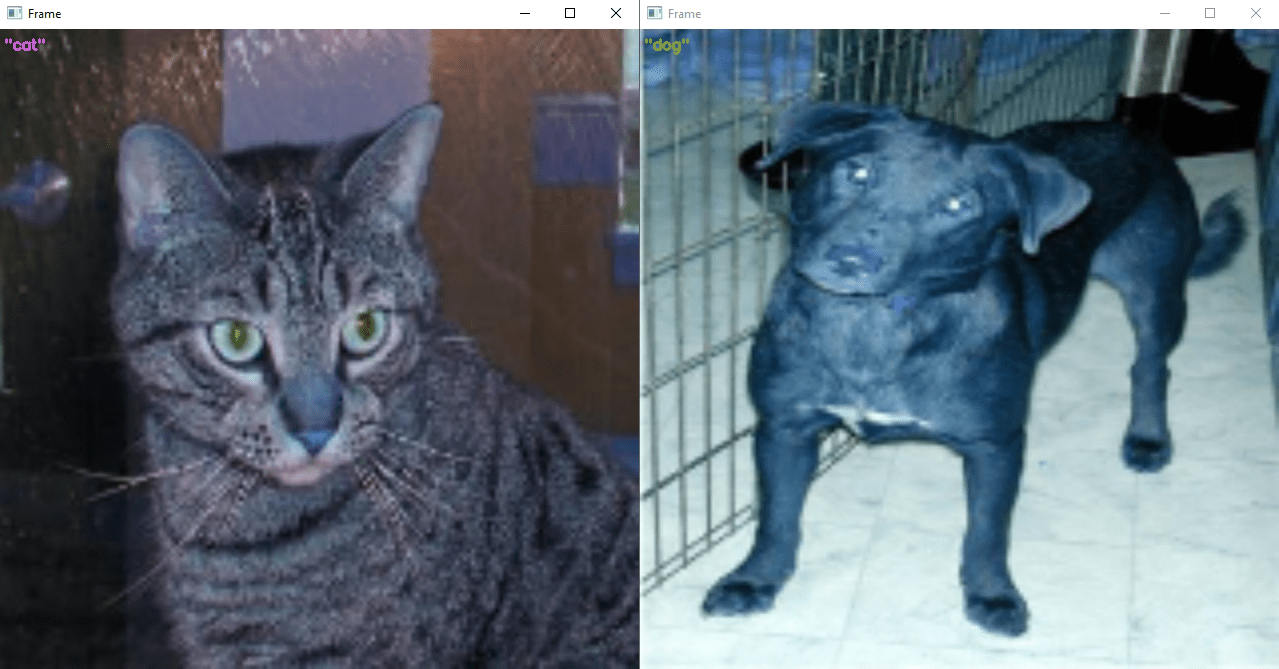
Using the trained model
You can use the trained model to classify new images containing a single object type per image. To do this, simply load the previously saved model (saved_models
#!/usr/bin/env python
# -*- coding: utf-8 -*-
#
#  ObjectRecognitionTFVideo.py
#  Description:
#		Use ModelNetV2-SSD model to detect objects on video
#
#  www.aranacorp.com

# import packages
import sys
from imutils.video import VideoStream
from imutils.video import FPS
import numpy as np
import argparse
import imutils
import time
import cv2
import tensorflow as tf
from PIL import Image

# load model from path
#model= tf.saved_model.load("./pretrained_models/ssd_mobilenet_v2_320x320_coco17_tpu-8/saved_model")
model= tf.saved_model.load("./saved_models/my_model")
#model.summary()

print("model loaded")

#load class names
#category_index = label_map_util.create_category_index_from_labelmap(PATH_TO_LABELS,use_display_name=True)
def read_label_map(label_map_path):

    item_id = None
    item_name = None
    items = {}

    with open(label_map_path, "r") as file:
        for line in file:
            line.replace(" ", "")
            if line == "item{":
                pass
            elif line == "}":
                pass
            elif "id" in line:
                item_id = int(line.split(":", 1)[1].strip())
            elif "display_name" in line: #elif "name" in line:
                item_name = line.split(":", 1)[1].replace("'", "").strip()

            if item_id is not None and item_name is not None:
                #items[item_name] = item_id
                items[item_id] = item_name
                item_id = None
                item_name = None

    return items

#class_names=read_label_map("./pretrained_models/ssd_mobilenet_v2_320x320_coco17_tpu-8/mscoco_label_map.pbtxt")
class_names = read_label_map("./saved_models/label_map.pbtxt")
class_names = list(class_names.values()) #convert to list
class_colors = np.random.uniform(0, 255, size=(len(class_names), 3))
print(class_names)

if __name__ == '__main__':

	# Open image
	#img= cv2.imread('./data/cats_and_dogs_filtered/train/cats/cat.1.jpg') #from image file
	img= cv2.imread('./data/cats_and_dogs_filtered/train/dogs/dog.1.jpg') #from image file
	img = cv2.resize(img,(160,160))
	img = cv2.cvtColor(img, cv2.COLOR_BGR2RGB)

	#input_tensor = np.expand_dims(img, 0)
	input_tensor = tf.convert_to_tensor(np.expand_dims(img, 0), dtype=tf.float32)

	# predict from model
	resp = model(input_tensor)
	print("resp: ",resp)
	score= tf.nn.sigmoid(resp).numpy()[0][0]*100
	cls = int(score>0.5)
	print("classId: ",int(cls))
	print("score: ",score)
	print("score: ",tf.nn.sigmoid(tf.nn.sigmoid(resp)))


	# write classname for bounding box
	cls=int(cls) #convert tensor to index
	label = "{}".format(class_names[cls])
	img = cv2.resize(img,(640,640))
	cv2.putText(img, label, (5, 20), cv2.FONT_HERSHEY_SIMPLEX, 0.5, class_colors[cls], 2)

	# Show frame
	cv2.imshow("Frame", img)
	cv2.waitKey(0)
Applications
- recognition of different animal breeds
- recognition of different types of objects, such as electronic cards
Other classification models to consider
- vgg16
- vgg19
- resnet50
- resnet101
- resnet152
- densenet121
- densenet169
- densenet201
- inceptionresnetv2
- inceptionv3
- mobilenet
- mobilenetv2
- nasnetlarge
- nasnetmobile
- xception


