A robot is constituted of four main components: Motors for motion, Mechanics to hold the pieces together, sensors to make it react to environment and a code to control them and create the desired functionality.
Sensors plays an important role when dealing with autonomous robot. We’ll see here how to use them.
Presentation
The purpose of a sensor is to measure a physical value (velocity, angle, temperature, etc.). There are numerous sensors of different types passive and active (require powering). In this example, we use a photoresistor but it can be applied to other type of sensor.
Here is a list of sensor :
Passif:
- photoresistor
- tilt
- push button
Actif:
- infrared distance sensor
- ultrasonic distance sensor
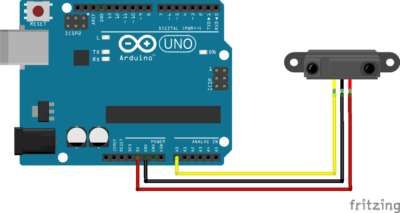
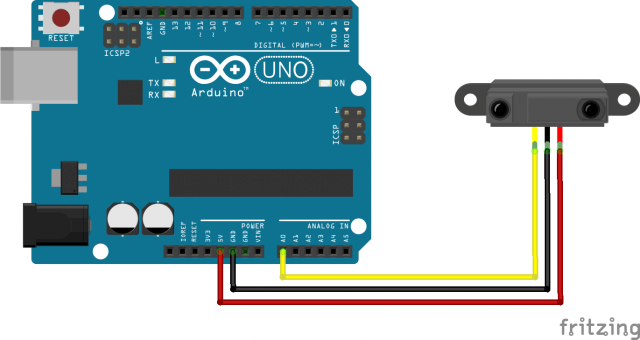
Wiring
Sensor have different wiring depending on the number of pin they use. They ususally have 3 pins ground, voltage supply 5V and the signal. For passive sensor, a third output as to be created to read the voltage at its ends.

Base code to read sensor
Depending on its type, sensor can return two informations: a state (presence or not) or a continous voltage value.
To read a state, the function to use is digitalRead(). It returns a level HIGH or LOW which represent the voltage applied on the digital pin (0, 1 , 2, etc.).
/*Read digital state*/
// Constants
#define DELAY 500 // Delay between two measurements in ms

// Parameters
const int sensorPin = 2; // Pin connected to sensor

//Variables
int sensorState; // state from the sensor

void setup(void) {
  Serial.begin(9600);
  pinMode(sensorPin,INPUT);
}

void loop(void) {
  sensorState = digitalRead(sensorPin);

  if (sensorState == HIGH) {
     Serial.print("Sensor state is HIGH ");
  } else {
     Serial.print("Sensor state is LOW ");
  }
  delay(DELAY);
}
To read a continuous value, the function we use is analogRead() . It returns a value between 0 and 1023 representing the voltage applied on the Arduino analog pin (A0, A1, A2, etc.).
/*Read analog signal*/
// Constants
#define DELAY 500 // Delay between two measurements in ms

// Parameters
const int sensorPin = A0; // Pin connected to sensor

//Variables
int sensorVal; // Analog value from the sensor

void setup(void) {
  Serial.begin(9600);
}

void loop(void) {
  sensorVal = analogRead(sensorPin);
  Serial.print("Sensor reading = ");
  Serial.println(sensorVal); // the analog reading
  delay(DELAY);
}
Use cases
- Measure temperature and humidity with sensor DHT11
- Measure temperature with sensor LM35
- Distance measurement with sensor HC-SR04
- Luminosity measurement with a photoresistor
Find other examples and tutorials in our Automatic code generator
Code Architect


Hi there! Would you mind if I share your blog with my myspace group? There’s a lot of people that I think would really appreciate your content. Please let me know. Many thanks
Hi John, thank you for your interest. Feel free to share the blog to anyone that would be interested.