The Raspberry Pi is a very powerful microcomputer that has the particularity of integrating a chip to manage the Wifi connection. This makes it an ideal object to develop connected objects and, in particular, web servers. In this tutorial we will see how to create and host a web interface to control your Raspberry Pi.
Prerequisites: Programming your Raspberry Pi, Connecting your Raspberry to Wifi
Material
- Computer
- Raspberry Pi 3 B+ or Zero (with Raspbian and VNC remote connection)
- Power supply 5V 2A
N.B.: This tutorial was written around a Raspberry Pi but it can very well be applied to any computer on which Python is installed.
Code
To create a web page, you need a file structure. An HTML file in combination with a CSS file to describe the page (front-end) and a Python script to manage requests from the browser to the server (back-end). It is possible to add PHP and JavaScript files in order to structure and add functionalities to the Web application.
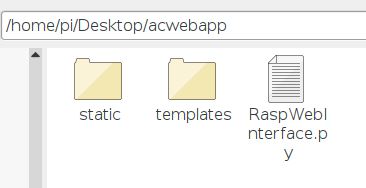
To organize these files, we will place them in subfolders:
- In the main folder (acwebapp), the script RaspWebInterface.py
- A static sub-folder, in which we will place the css script
- A sub-folder templates, in which we will place the HTML script
Code Python with Flask
We will create a Python script using Flask in order to display the page rpi3b_webcontroller.html when requested by the web browser. The library used to generate a simple web application is the Flask micro-framework.
Functions to remember:
- app=Flask(name) to instantiate the Flask application
- @app.route(‘/’) decorator to handle URL requests
- return render_template(‘rpi3b_webcontroller.html’,**templateData) to send the web page to the browser
- return ” OK 200 ” to validate the reception of a request
- app.run(debug=True, port=5000, host=’0.0.0.0′,threaded=True) to launch the application on the local IP with port 5000
import os
import RPi.GPIO as GPIO
from flask import Flask, render_template, Response
import datetime

GPIO.setmode(GPIO.BCM)
dataPin=[i for i in range(2,28)]
for dp in dataPin: GPIO.setup(dp,GPIO.IN)#,pull_up_down=GPIO.PUD_UP)

data=[]
now=datetime.datetime.now()
timeString=now.strftime("%Y-%m-%d %H:%M")
templateData={
	'title':'Raspberry Pi 3B+ Web Controller',
	'time':timeString,
	'data':data,
}

def getData():
	data=[]
	for i,dp in enumerate(dataPin): data.append(GPIO.input(dataPin[i]))

	return data

app=Flask(__name__)

@app.route('/')
def index():
	#return 'hello world!'
	now=datetime.datetime.now()
	timeString=now.strftime("%Y-%m-%d %H:%M")
	data=getData()
	templateData={
		'title':'Raspberry Pi 3B+ Web Controller',
		'time':timeString,
		'data':data,
	}
	#return render_template('rpi_index.html',**templateData)
	return render_template('rpi3b_webcontroller.html',**templateData)

@app.route('/<actionid>')
def handleRequest(actionid):
	print("Button pressed : {}".format(actionid))
	return "OK 200"

if __name__=='__main__':
	os.system("sudo rm -r  ~/.cache/chromium/Default/Cache/*")
	app.run(debug=True, port=5000, host='0.0.0.0',threaded=True)
	#local web server http://192.168.1.200:5000/
	#after Port forwarding Manipulation http://xx.xx.xx.xx:5000/
HTML code
The .html file contains the description of the web page and the JavaScript code to manage the buttons.
<!DOCTYPE HTML>
	<html>
		<head>
			<title> AranaCorp </title>

			<meta http-equiv='content-type' content='text/html; charset=UTF-8'>
			<meta name='apple-mobile-web-app-capable' content='yes' />
			<meta name='apple-mobile-web-app-status-bar-style' content='black-translucent' />
			<meta http-equiv='refresh' content='10'>

			<link rel="stylesheet" href='../static/rpi_style.css'/>
			<script src="//ajax.googleapis.com/ajax/libs/jquery/1.9.1/jquery.min.js"></script>
		</head>

		<body bgcolor = '#70706F'>
			<hr/><hr>
			<h1 style='color : #3AAA35;'><center> AranaCorp - {{title}} </center></h1>
			<hr/><hr>
			<br><br>
			<h2><center><p>Date and time :  {{time}}</p></center></h2>
			<br><br><h2> Digital Inputs/Ouputs </h2>
			<div id='btnContainer'>
				  <center>
				  Pin GPIO2
				  <input value={{data[0]}} readonly></input>
				  <button id='dig2on'>Turn On </button></a>
				  <button id='dig2off'>Turn Off </button></a><br />
				  </center>
				  <center>
				  Pin GPIO3
				  <input value={{data[1]}} readonly></input>
				  <button id='dig3on'>Turn On </button></a>
				  <button id='dig3off'>Turn Off </button></a><br />
				  </center><center>
				  Pin GPIO4
				  <input value={{data[2]}} readonly></input>
				  <button id='dig4on'>Turn On </button></a>
				  <button id='dig4off'>Turn Off </button></a><br />
				  </center><center>
				  Pin GPIO5
				  <input value={{data[3]}} readonly></input>
				  <button id='dig5on'>Turn On </button></a>
				  <button id='dig5off'>Turn Off </button></a><br />
				  </center><center>
				  Pin GPIO6
				  <input value={{data[4]}} readonly></input>
				  <button id='dig6on'>Turn On </button></a>
				  <button id='dig6off'>Turn Off </button></a><br />
				  </center><center>
				  Pin GPIO7
				  <input value={{data[5]}} readonly></input>
				  <button id='dig7on'>Turn On </button></a>
				  <button id='dig7off'>Turn Off </button></a><br />
				  </center><center>
				  Pin GPIO8
				  <input value={{data[6]}} readonly></input>
				  <button id='dig8on'>Turn On </button></a>
				  <button id='dig8off'>Turn Off </button></a><br />
				  </center><center>
				  Pin GPIO9
				  <input value={{data[7]}} readonly></input>
				  <button id='dig9on'>Turn On </button></a>
				  <button id='dig9off'>Turn Off </button></a><br />
				  </center><center>
				  Pin GPIO10
				  <input value={{data[8]}} readonly></input>
				  <button id='dig10on'>Turn On </button></a>
				  <button id='dig10off'>Turn Off </button></a><br />
				  </center><center>
				  Pin GPIO11
				  <input value={{data[9]}} readonly></input>
				  <button id='dig11on'>Turn On </button></a>
				  <button id='dig11off'>Turn Off </button></a><br />
				  </center><center>
				  Pin GPIO12
				  <input value={{data[10]}} readonly></input>
				  <button id='dig12on'>Turn On </button></a>
				  <button id='dig12off'>Turn Off </button></a><br />
				  </center><center>
				  Pin GPIO13
				  <input value={{data[11]}} readonly></input>
				  <button id='dig13on'>Turn On </button></a>
				  <button id='dig13off'>Turn Off </button></a><br />
				  </center><center>
				  Pin GPIO14
				  <input value={{data[12]}} readonly></input>
				  <button id='dig14on'>Turn On </button></a>
				  <button id='dig14off'>Turn Off </button></a><br />
				  </center><center>
				  Pin GPIO15
				  <input value={{data[13]}} readonly></input>
				  <button id='dig15on'>Turn On </button></a>
				  <button id='dig15off'>Turn Off </button></a><br />
				  </center><center>
				  Pin GPIO16
				  <input value={{data[14]}} readonly></input>
				  <button id='dig16on'>Turn On </button></a>
				  <button id='dig16off'>Turn Off </button></a><br />
				  </center><center>
				  Pin GPIO17
				  <input value={{data[15]}} readonly></input>
				  <button id='dig17on'>Turn On </button></a>
				  <button id='dig17off'>Turn Off </button></a><br />
				  </center>
				  <center>
				  Pin GPIO18
				  <input value={{data[16]}} readonly></input>
				  <button id='dig18on'>Turn On </button></a>
				  <button id='dig18off'>Turn Off </button></a><br />
				  </center><center>
				  Pin GPIO19
				  <input value={{data[17]}} readonly></input>
				  <button id='dig19on'>Turn On </button></a>
				  <button id='dig19off'>Turn Off </button></a><br />
				  </center>
				  <center>
				  Pin GPIO20
				  <input value={{data[18]}} readonly></input>
				  <button id='dig20on'>Turn On </button></a>
				  <button id='dig20off'>Turn Off </button></a><br />
				  </center>
				  <center>
				  Pin GPIO21
				  <input value={{data[19]}} readonly></input>
				  <button id='dig21on'>Turn On </button></a>
				  <button id='dig21off'>Turn Off </button></a><br />
				  </center>
				  <center>
				  Pin GPIO22
				  <input value={{data[20]}} readonly></input>
				  <button id='dig22on'>Turn On </button></a>
				  <button id='dig22off'>Turn Off </button></a><br />
				  </center>
				  <center>
				  Pin GPIO23
				  <input value={{data[21]}} readonly></input>
				  <button id='dig23on'>Turn On </button></a>
				  <button id='dig23off'>Turn Off </button></a><br />
				  </center>
				  <center>
				  Pin GPIO24
				  <input value={{data[22]}} readonly></input>
				  <button id='dig24on'>Turn On </button></a>
				  <button id='dig24off'>Turn Off </button></a><br />
				  </center>
				  <center>
				  Pin GPIO25
				  <input value={{data[23]}} readonly></input>
				  <button id='dig25on'>Turn On </button></a>
				  <button id='dig25off'>Turn Off </button></a><br />
				  </center>
				  <center>
				  Pin GPIO26
				  <input value={{data[24]}} readonly></input>
				  <button id='dig26on'>Turn On </button></a>
				  <button id='dig26off'>Turn Off </button></a><br />
				  </center>
				  <center>
				  Pin GPIO27
				  <input value={{data[25]}} readonly></input>
				  <button id='dig27on'>Turn On </button></a>
				  <button id='dig27off'>Turn Off </button></a><br />
				  </center>
			 </div>

			 <script>
				// Event Listener
				var buttonClick = document.getElementById('btnContainer').addEventListener('click', function(event) {
				  if (event.target.nodeName == "BUTTON") {
					var tar = event.target.id;
					console.log(tar);
					$.getJSON('/'+tar,
						function(data) {
					  //do nothing
					});

					return false;
				  }
				});
			</script>
	</body>
</html>
Zoom on JavaScript code
The JavaScript code will allow us to manage the pressing of the buttons of the interface. To do this we will create a “click” event listener (eventListener) on the “btnContainer” element that will detect if a button (Button) is clicked and will return its identifier via a json request.
// Event Listener

		var buttonClick = document.getElementById('btnContainer').addEventListener('click', function(event) {

		  if (event.target.nodeName == "BUTTON") {

			var tar = event.target.id;

			console.log(tar);

			$.getJSON('/'+tar,

                function(data) {

              //do nothing

            });

            return false;

		  }

		});
File rpi_style.css
The css file contains the style of the page and in particular the buttons so that the page has a personalized aspect.
body{
background-color:#70706F;
}

h1{
	color:#3AAA35;
}

h3{
	#width:100%;
	border: 3px solid #3AAA35;
	border-radius: 6px;
	overflow: hidden;
	text-align:center;
	padding:20px;
}


button{
  width:auto;
  height:60px;
  background-color: #3aaa35;/* Green */
  border: none;
  color: white;
  /*padding: 15px 32px;*/
  text-align: center;
  vertical-align:middle;
  text-decoration: none;
  display: inline-block;
  font-size: 20px;
  border-radius: 12px;
  -webkit-transition-duration: 0.4s; /* Safari */
  transition-duration: 0.4s;
  margin: 5px;
}
button:hover{
  background-color: #4CAF50; /* Green */
  color: white;
}
Recover the IP address of the Raspberry Pi
In order to access the web interface hosted on the Raspberry Pi, we need to know the IP address so that we can connect to the local network from a web browser. To do this, simply enter the command line ifconfig in the Raspberry Pi terminal.
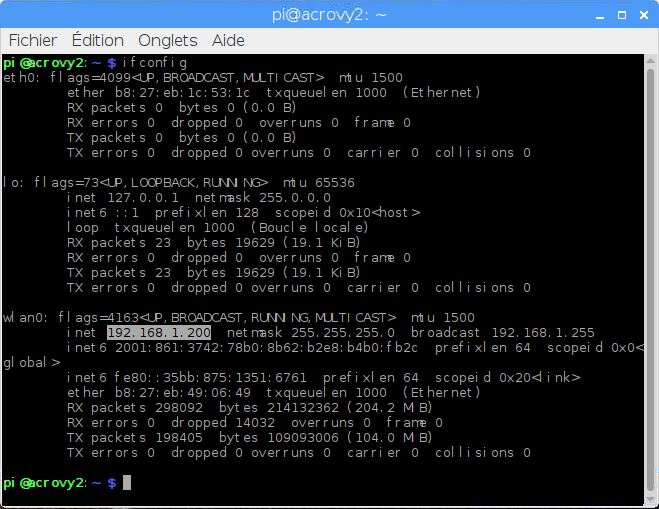
N.B.: It is possible to access the Raspberry Pi outside the local network by doing a manipulation on the box to which the Raspberry Pi is connected. This procedure is called Port Forwarding.
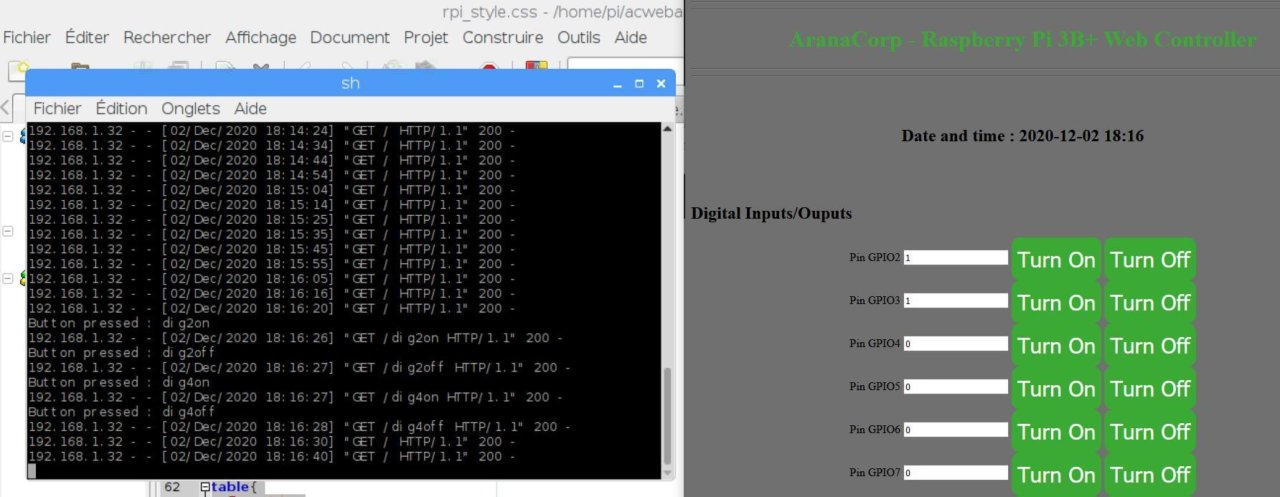
Result
When you run the Python script on the Raspberry Pi, you can then enter the IP address of your Raspberry Pi followed by the port (here 192.168.1.200:5000) on your computer or smartphone. The web page should appear
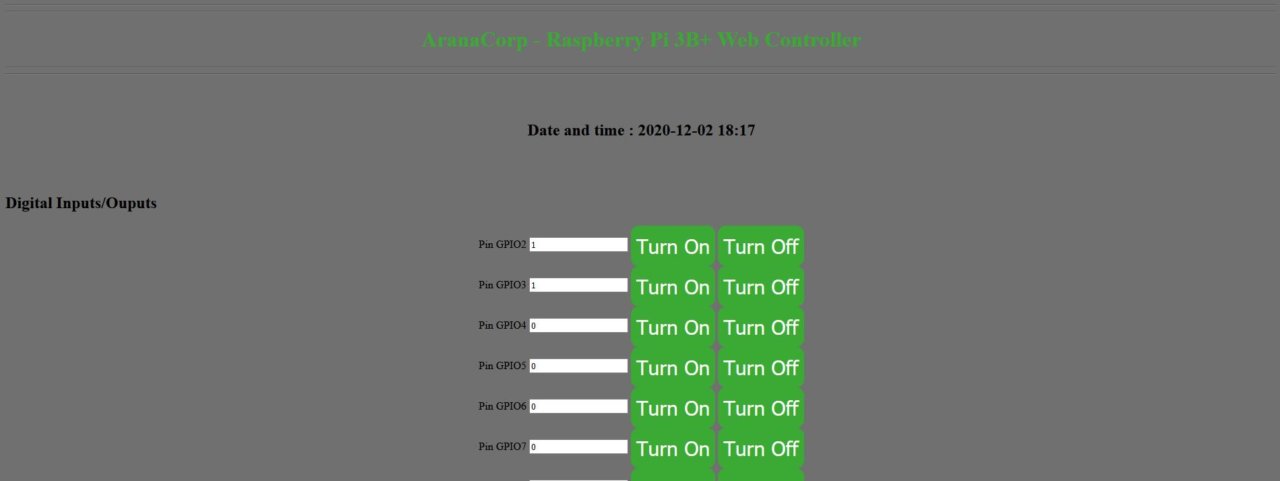
You can then see what happens when you press the buttons in the terminal via the VNC application.
Applications
- Create a home automation system controllable via Wifi
- Control your Raspberry Pi from anywhere
Sources
Retrouvez nos tutoriels et d’autres exemples dans notre générateur automatique de code
La Programmerie


