The Motor Shield V2 is an expansion board for microcontrollers Arduino UNO and Mega to control DC and stepper motors. For motor control, it is possible to use integrated circuits directly but their use requires significant wiring can quickly become unmanageable.
To make clean prohect, you can either create your own PCB or use Shields.
We will use the Motor Shield V2 and see the improvements over the previous version.
Prerequisite: Programming with Arduino
Hardware
- Computer
- ArduinoUNO
- USB A Male/B Male
- MotorShieldV2
- DC motor or stepper x1
Operating principle
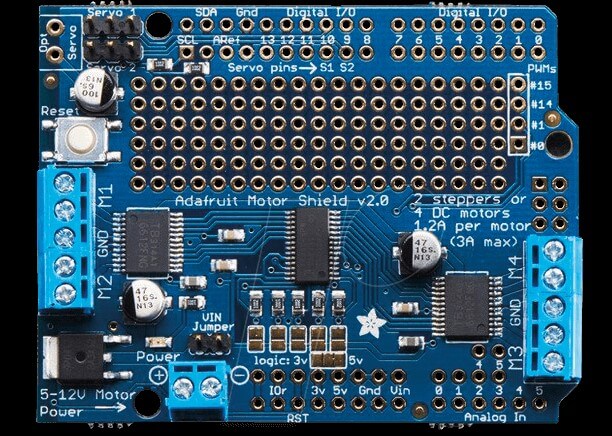
The Motor Shield V2 uses the MOSFET TB6612 with 1.2A capacity per channel and I2C communication. It uses fewer pins than the previous version:
- Digital pin SCL/A5: Communication I2C Serial Clock Line
- Digital pin SDA/A4: Communication I2C Serial Data Line
The Motor Shield V2 has jumper to select the I2C address and is stackable. Which mean, you can operate up to 32 shieds (64 steppers or DC motors 128) with a single Arduino.
In the case of a shield, the connections are predefined. Make sure the component’s technical documentation to use it.
Schematics
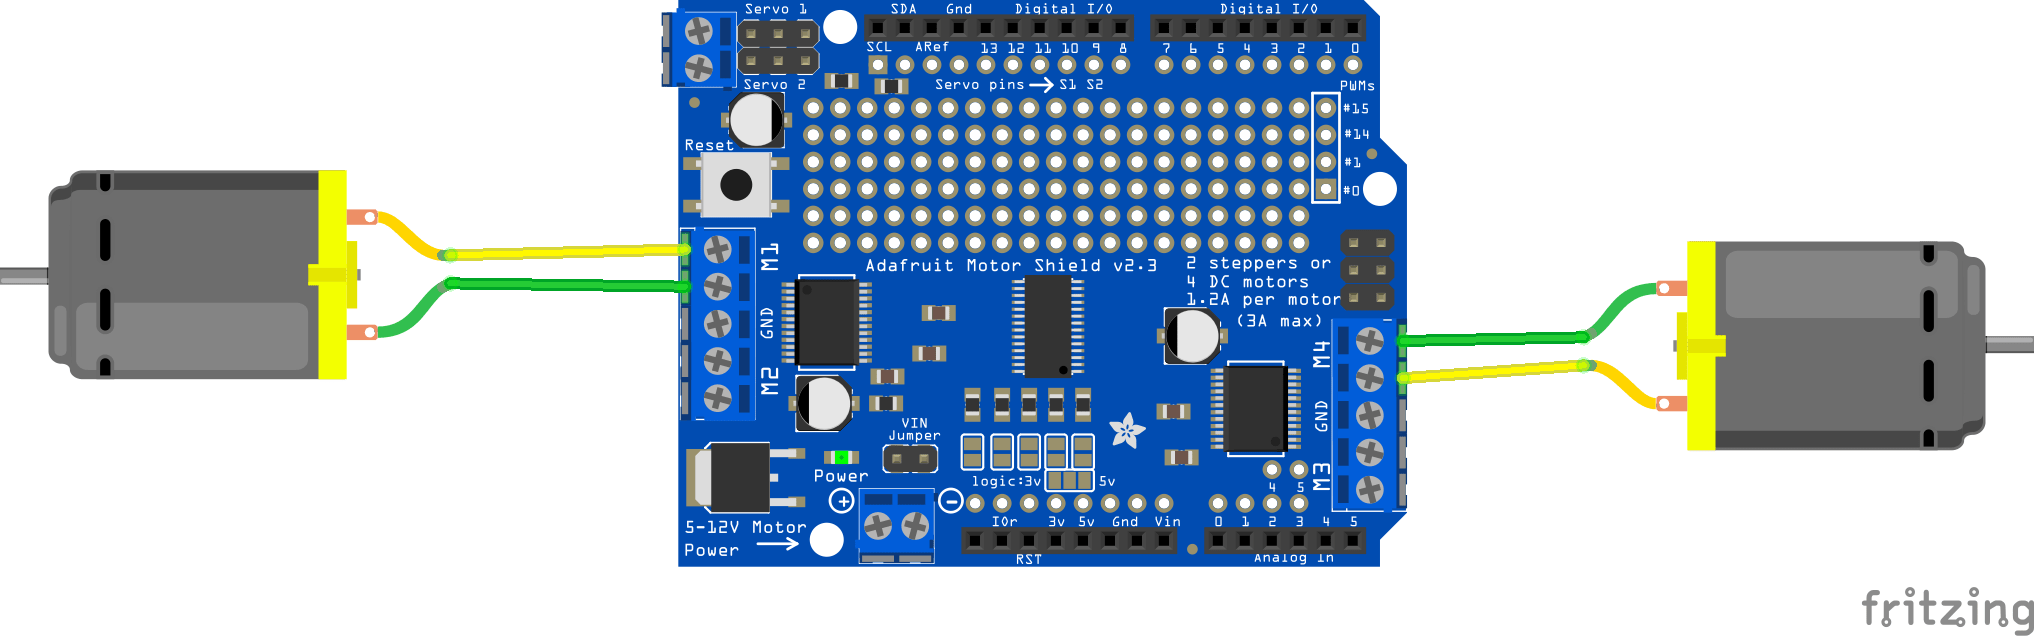
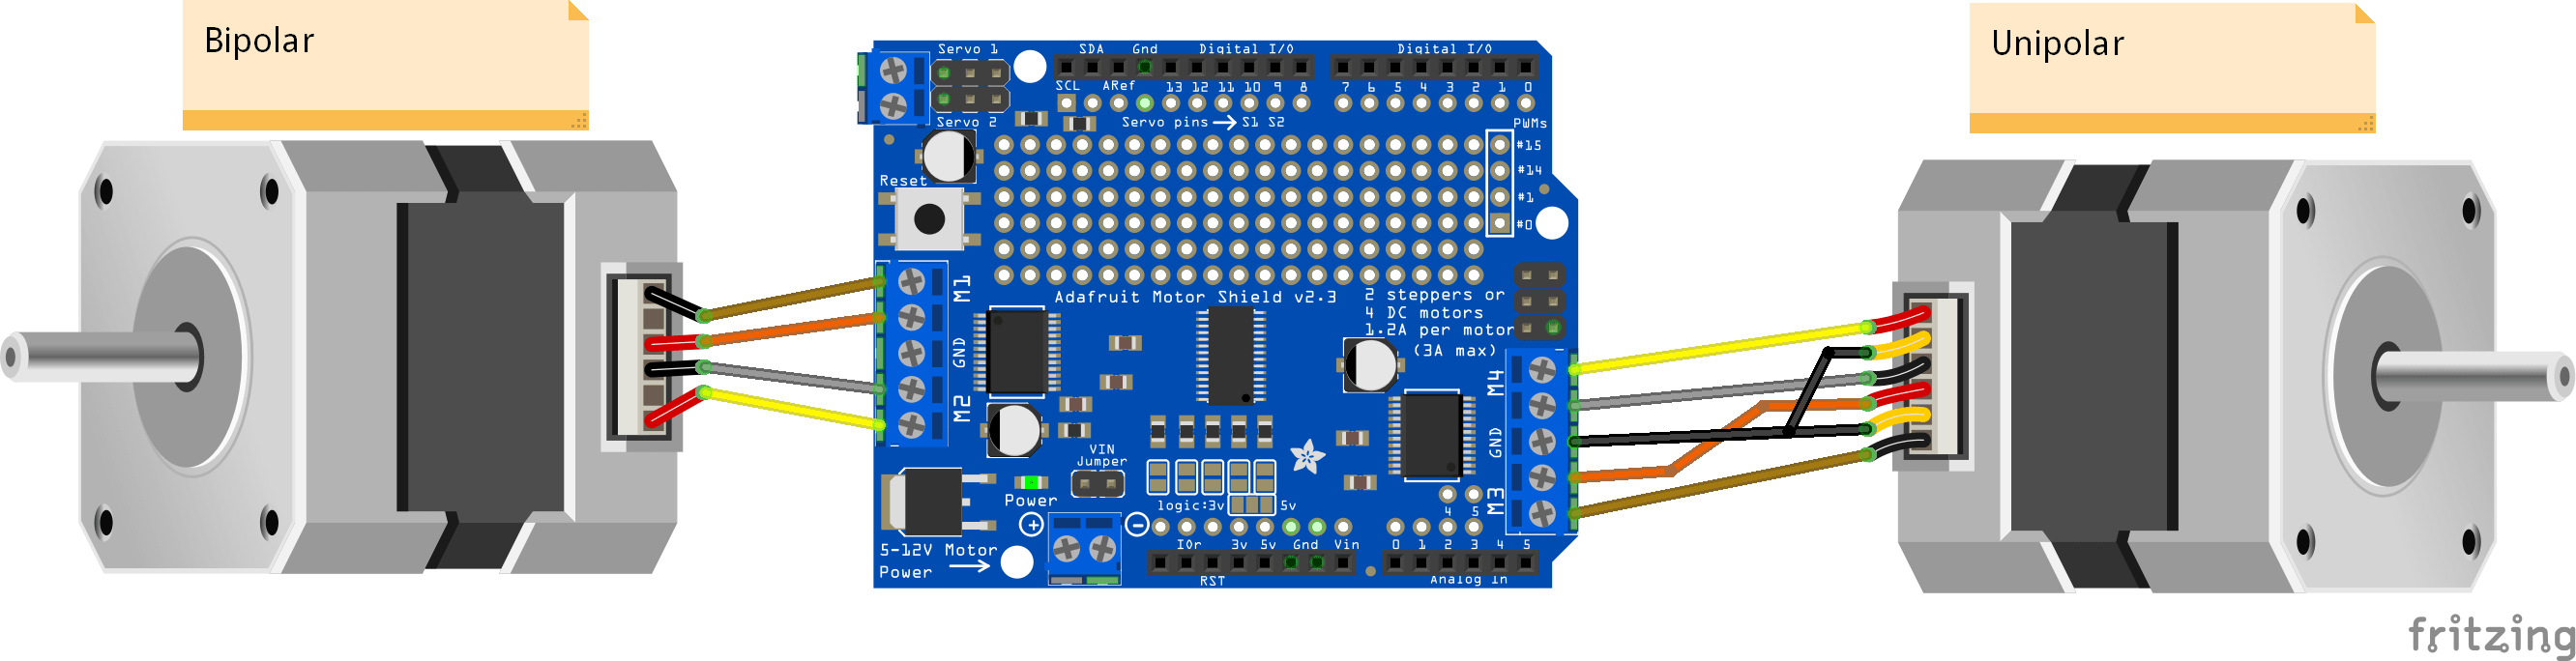
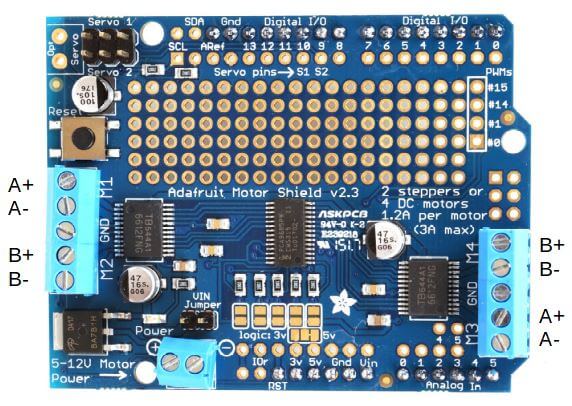
Compatible with UNO and Mega card, the shield is placed directly on the Arduino board. Power connects to Power terminal block. The motors are connected to the terminals M1 to M4. Three types of motors can be connected to the shield (excluding actuators):
- DC motor
- Unipolar stepper motor
- Bipolar stepper
The connections of these engines are described in the following schemes.
Code for driving DC motors
To interact with the Motor Shield V2, we use the library Adafruit_MotorShield.h .
To drive a DC motor, we will use the Adafruit_DCMotor class whose functions are:
- motor.getMotor (whole) to select the motor used
- motor.run () to activate the motor in one direction or the other (RELEASE, BACKWARD, FORWARD).
- motor.setSpeed () to adjust the speed
#include <Wire.h>
#include <Adafruit_MotorShield.h>

// Create the motor shield object with the default I2C address
Adafruit_MotorShield AFMS = Adafruit_MotorShield();
// Or, create it with a different I2C address (say for stacking)
// Adafruit_MotorShield AFMS = Adafruit_MotorShield(0x61);

// Select which 'port' M1, M2, M3 or M4. In this case, M1
Adafruit_DCMotor *myMotor = AFMS.getMotor(1);
// You can also make another motor on port M2
//Adafruit_DCMotor *myOtherMotor = AFMS.getMotor(2);

void setup() {
  Serial.begin(9600);           // set up Serial library at 9600 bps
  Serial.println("Adafruit Motorshield v2 - DC Motor test!");

  AFMS.begin();  // create with the default frequency 1.6KHz
  //AFMS.begin(1000);  // OR with a different frequency, say 1KHz

  // Set the speed to start, from 0 (off) to 255 (max speed)
  myMotor->setSpeed(150);
  myMotor->run(FORWARD);
  // turn on motor
  myMotor->run(RELEASE);
}

void loop() {
  uint8_t i;

  Serial.print("tick");

  myMotor->run(FORWARD);
  for (i=0; i<255; i++) {
    myMotor->setSpeed(i);
    delay(10);
  }
  for (i=255; i!=0; i--) {
    myMotor->setSpeed(i);
    delay(10);
  }

  Serial.print("tock");

  myMotor->run(BACKWARD);
  for (i=0; i<255; i++) {
    myMotor->setSpeed(i);
    delay(10);
  }
  for (i=255; i!=0; i--) {
    myMotor->setSpeed(i);
    delay(10);
  }

  Serial.print("tech");
  myMotor->run(RELEASE);
  delay(1000);
}
Code for controlling stepper motors
To control the step-by-step motors we will use the Adafruit_StepperMotor class whose functions are:
- motor.getStepper (number of steps, terminal used) to select the motor used
- motor.setSpeed (speed) to adjust the speed
- motor.step (number of steps, direction, algortihme) to rotate a number of steps in one direction or the other
#include <Wire.h>
#include <Adafruit_MotorShield.h>

// Create the motor shield object with the default I2C address
Adafruit_MotorShield AFMS = Adafruit_MotorShield();
// Or, create it with a different I2C address (say for stacking)
// Adafruit_MotorShield AFMS = Adafruit_MotorShield(0x61);

// Connect a stepper motor with 4080 steps per revolution (1.8 degree)
// to motor port #2 (M3 and M4)
Adafruit_StepperMotor *myMotor = AFMS.getStepper(48, 2);


void setup() {
  Serial.begin(9600);           // set up Serial library at 9600 bps
  Serial.println("Stepper test!");

  AFMS.begin();  // create with the default frequency 1.6KHz
  //AFMS.begin(1000);  // OR with a different frequency, say 1KHz

  myMotor->setSpeed(10);  // 10 rpm
}

void loop() {
  int nbSteps=4080;

  Serial.println("Single coil steps forward");
  myMotor->step(nbSteps, FORWARD, SINGLE);
  delay(1000);
  Serial.println("Single coil steps backward");
  myMotor->step(nbSteps, BACKWARD, SINGLE);
  delay(1000);
  Serial.println("Double coil steps forward");
  myMotor->step(nbSteps, FORWARD, DOUBLE);
  Serial.println("Double coil steps backward");
  myMotor->step(nbSteps, BACKWARD, DOUBLE);
  delay(1000);
  Serial.println("Interleave coil steps forward");
  myMotor->step(nbSteps, FORWARD, INTERLEAVE);
  Serial.println("Interleave coil steps backward");
  myMotor->step(nbSteps, BACKWARD, INTERLEAVE);
  delay(1000);
  Serial.println("Microstep steps forward");
  myMotor->step(50, FORWARD, MICROSTEP);
  Serial.println("Microstep steps backward");
  myMotor->step(50, BACKWARD, MICROSTEP);
  delay(1000);
}
Convert Code from V1 to V2
To convert your code from Motor Shield V1 to V2, the following modification should be made:
- Replace library
#include <Adafruit_MotorShield.h>
- Create MotorShield object:
Adafruit_MotorShield AFMS = Adafruit_MotorShield();
- Create DCmotor using pointer:
Adafruit_DCMotor *motorG = AFMS.getMotor(1);
Adafruit_StepperMotor *myMotor = AFMS.getStepper(48, 2); - Initilize shield:
AFMS.begin();
- Replace “.” with “->” when function call:
motorG->setSpeed(motorSpeed);
motorG->run(RELEASE);
Test and mix those examples to obtain the desired functionalities. If you encounter any issue, do not hesitate to write a comment or send us a message.
Applications
- Manage motors of a robot
Sources
- https://learn.adafruit.com/adafruit-motor-shield-v2-for-arduino
- https://github.com/adafruit/Adafruit_Motor_Shield_V2_Library/blob/master/Adafruit_MotorShield.h
Find other examples and tutorials in our Automatic code generator
Code Architect


Thank you!
The article helped me a lot.
It’s clear, simple, easily understandable.