In this tutorial, we’ll look at how to perform object recognition with TensorFlow and OpenCV, using a neural network pre-trained with deep learning. We saw in a previous tutorial how to recognise simple shapes using computer vision. This method only works for certain simple predefined shapes. If you want to recognise a wider variety of objects, the easiest way is to use artificial intelligence.
Hardware
- A computer with a Python3 installation
- A camera
Principle
Artificial intelligence is a field of computer science in which the program itself learns to perform certain tasks. Visual recognition in particular. In this tutorial, we’ll use a trained neural network to recognize particular shapes.
You need a lot of data to train a neural network properly. It has been shown that learning is faster on a neural network trained for something else. For example, a neural network trained to recognize dogs will train more easily to recognize cats.
Python configuration
If not, you can download and install Python 3
You can then install the necessary OpenCV, numpy and imutils libraries.
python3 -m pip install opencv-python numpy imutils
Here are the versions I’m using in this tutorial
numpy== 1.22.0
tensorflow== 2.13.0
opencv== 4.6.0
N.B.: When using certain python packages such as TensorFlow, compatibility problems can occur very frequently. If you have difficulties, don’t hesitate to install specific versions of the packages. If you have several projects in progress, I strongly recommend that you create virtual environments (venv).
Retrieving a pre-trained model
Download ModelNet-SSD from Model Zoo (e.g. MobileNet SSD v2 320×320)
Download the mscoco_label_map.pbtxt file, which contains the identifiers of the objects recognized by the model.
N.B.: in a previous tutorial, we used the results of the Caffe framework for the model (prototxt and caffemodel files). In this article, we use TensorFlow’s SavedModel.
Create a TensorFlowCV folder, which will be your workspace. In this folder, create a pretrained_models folder in which you can unzip the downloaded model.
You can also create a data folder in which to place your images or videos.
Place the model files in a folder and create the file ObjectRecognition.py
Python script for object recognition
First, we create a video stream (vs) using the imutils library, which will retrieve images from the camera.
vs = VideoStream(src=0, resolution=(1600, 1200)).start()
We initialize a neural network with the parameters of SSD-ModelNetV2 (net) using the TensorFlow library.
model= tf.saved_model.load("./pretrained_models/ssd_mobilenet_v2_320x320_coco17_tpu-8/saved_model")
A function retrieves the names of the classes recognized by the model from the pbtxt file.
#load class names
def read_label_map(label_map_path):

    item_id = None
    item_name = None
    items = {}

    with open(label_map_path, "r") as file:
        for line in file:
            line.replace(" ", "")
            if line == "item{":
                pass
            elif line == "}":
                pass
            elif "id" in line:
                item_id = int(line.split(":", 1)[1].strip())
            elif "display_name" in line: #elif "name" in line:
                item_name = line.split(":", 1)[1].replace("'", "").strip()

            if item_id is not None and item_name is not None:
                #items[item_name] = item_id
                items[item_id] = item_name
                item_id = None
                item_name = None

    return items

class_names=read_label_map("./pretrained_models/ssd_mobilenet_v2_320x320_coco17_tpu-8/mscoco_label_map.pbtxt")
class_colors = np.random.uniform(0, 255, size=(len(class_names), 3))
Next, we’ll create a loop which, at each iteration, reads the camera image and passes it to the neural network for object detection and recognition.
	#Main loop
	while True:
		# Get video sttream. max width 800 pixels
		#img = vs.read()
		img= cv2.imread('./data/two-boats.jpg') #from image file
		#ret, img=vc.read() #from video or ip cam
		img = imutils.resize(img, width=800)

		img = cv2.cvtColor(img, cv2.COLOR_BGR2RGB)
		# get height and width of image
		h, w, _ = img.shape

		input_tensor = np.expand_dims(img, 0)

		# predict from model
		resp = model(input_tensor)
Finally, the code displays the detection box, recognition probability and position on the image.
					# write classname for bounding box
					cls=int(cls) #convert tensor to index
					label = "{}: {:.2f}%".format(class_names[cls],score * 100)
					cv2.putText(img, label, (xmin, ymin-10), cv2.FONT_HERSHEY_SIMPLEX, 1, class_colors[cls], 1)

					#display position
					X= (xmax+xmin)/2
					Y= (ymax+ymin)/2
					poslbl= "X: ({},{})".format(X,Y)
					cv2.circle(img, (int(X)-15, int(Y)), 1, class_colors[cls], 2)
					cv2.putText(img, poslbl, (int(X), int(Y)),
						cv2.FONT_HERSHEY_SIMPLEX, 0.5, class_colors[cls], 2)

					# draw on image
					cv2.rectangle(img, (xmin, ymin), (xmax, ymax), class_colors[cls], 4)
Complete object recognition code with OpenCV and TensorFlow
#!/usr/bin/env python
# -*- coding: utf-8 -*-
#
#  ObjectRecognitionTFVideo.py
#  Description:
#		Use ModelNetV2-SSD model to detect objects on image or video
#
#  www.aranacorp.com

# import packages
import sys
from imutils.video import VideoStream
from imutils.video import FPS
import numpy as np
import argparse
import imutils
import time
import cv2
import tensorflow as tf


# load model from path
model= tf.saved_model.load("./pretrained_models/ssd_mobilenet_v2_320x320_coco17_tpu-8/saved_model")
print("model loaded")

#load class names
def read_label_map(label_map_path):

    item_id = None
    item_name = None
    items = {}

    with open(label_map_path, "r") as file:
        for line in file:
            line.replace(" ", "")
            if line == "item{":
                pass
            elif line == "}":
                pass
            elif "id" in line:
                item_id = int(line.split(":", 1)[1].strip())
            elif "display_name" in line: #elif "name" in line:
                item_name = line.split(":", 1)[1].replace("'", "").strip()

            if item_id is not None and item_name is not None:
                #items[item_name] = item_id
                items[item_id] = item_name
                item_id = None
                item_name = None

    return items

class_names=read_label_map("./pretrained_models/ssd_mobilenet_v2_320x320_coco17_tpu-8/mscoco_label_map.pbtxt")
class_colors = np.random.uniform(0, 255, size=(len(class_names), 3))


if __name__ == '__main__':

	# Camera initialisation
	print("Start Camera...")
	vs = VideoStream(src=0, resolution=(1600, 1200)).start() #from usb cam
	#vs = VideoStream(usePiCamera=True, resolution=(1600, 1200)).start() #from RPi cam
	#vc = cv2.VideoCapture('./data/Splash - 23011.mp4') #from video file

	time.sleep(2.0)
	fps = FPS().start()

	#Main loop
	while True:
		#get image
		img = vs.read() # Get video stream
		#img= cv2.imread('./data/two-boats.jpg') #from image file
		#ret, img=vc.read() #from video or ip cam

                #process image
		img = imutils.resize(img, width=800) #max width 800 pixels
		img = cv2.cvtColor(img, cv2.COLOR_BGR2RGB)
		# get height and width of image
		h, w, _ = img.shape

		input_tensor = np.expand_dims(img, 0)

		# predict from model
		resp = model(input_tensor)

		# iterate over boxes, class_index and score list
		for boxes, classes, scores in zip(resp['detection_boxes'].numpy(), resp['detection_classes'], resp['detection_scores'].numpy()):
			for box, cls, score in zip(boxes, classes, scores): # iterate over sub values in list
				if score > 0.61: # we are using only detection with confidence of over 0.6
					ymin = int(box[0] * h)
					xmin = int(box[1] * w)
					ymax = int(box[2] * h)
					xmax = int(box[3] * w)

					# write classname for bounding box
					cls=int(cls) #convert tensor to index
					label = "{}: {:.2f}%".format(class_names[cls],score * 100)
					cv2.putText(img, label, (xmin, ymin-10), cv2.FONT_HERSHEY_SIMPLEX, 1, class_colors[cls], 1)

					#display position
					X= (xmax+xmin)/2
					Y= (ymax+ymin)/2
					poslbl= "X: ({},{})".format(X,Y)
					cv2.circle(img, (int(X)-15, int(Y)), 1, class_colors[cls], 2)
					cv2.putText(img, poslbl, (int(X), int(Y)),
						cv2.FONT_HERSHEY_SIMPLEX, 0.5, class_colors[cls], 2)

					# draw on image
					cv2.rectangle(img, (xmin, ymin), (xmax, ymax), class_colors[cls], 4)


		# Show video frame
		cv2.imshow("Frame", img)
		key = cv2.waitKey(1) & 0xFF

		# Exit script with letter q
		if key == ord("q"):
			break

		# FPS update
		fps.update()

	# Stops fps and display info
	fps.stop()
	print("[INFO] elapsed time: {:.2f}".format(fps.elapsed()))
	print("[INFO] approx. FPS: {:.2f}".format(fps.fps()))

	cv2.destroyAllWindows()
	vs.stop()
	#vc.release()
Image sources for object detection
You can use this script with different image sources. To do so, you’ll need to adapt the previous code slightly to modify the “img” variable containing the image to be analyzed.
- Your computer’s webcam
vs = VideoStream(src=0, resolution=(1600, 1200)).start()
while True:
	frame = vs.read()
The video stream must be stopped at the end of the script with vs.stop()
vc = cv2.VideoCapture('rtsp://user:password@ipaddress:rtspPort')
while True:
	ret, frame=vc.read() #from ip cam
Make sure to stop video capture at the end of the script with vc.release()
- Raspberry Pi Picam
vs = VideoStream(usePiCamera=True, resolution=(1600, 1200)).start()
while True:
	frame = vs.read()
Remember to stop the stream at the end of the script with vs.stop()
- A video file
vc = cv2.VideoCapture('./img/Splash - 23011.mp4') #from video
while True:
	ret, frame=vc.read() #from video
- An image file
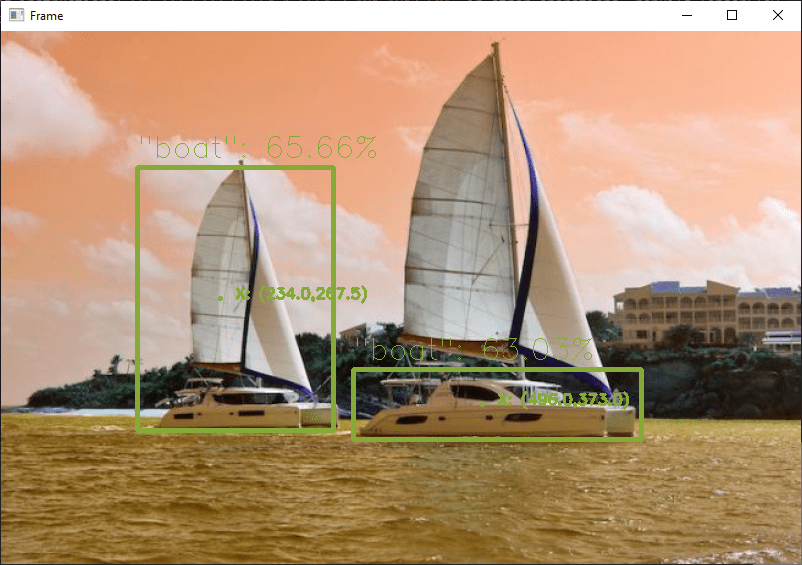
frame= cv2.imread('./img/two-boats.jpg')
Results
In this example, we send the neural network an image of two boats, which are correctly recognized. To obtain slightly different results, you can modify the confidence parameter to avoid false positives.
You can test this code with your webcam or with photos, for example, to see how the model and object recognition perform.
Once your script is up and running, you can train your model to detect other objects.
Packages and Templates
In this tutorial, we’ve used the SSD ModelNetV2 pre-trained model. It’s worth noting that there are other classification models with different performance and characteristics.
- vgg16
- vgg19
- resnet50
- resnet101
- resnet152
- densenet121
- densenet169
- densenet201
- inceptionresnetv2
- inceptionv3
- mobilenet
- mobilenetv2
- nasnetlarge
- nasnetmobile
- xception
Don’t hesitate to leave us a comment to share the models you use or know about, and your feedback.


